Frank-avatar
Frank 1 day ago
Question
Does anyone have FrankenPHP in production?
Hello everyone, I came across the project FrankenPHP some time ago. FrankenPHP is a modern PHP server that integrates PHP into your Go applications and runs as a full web server or behind common proxies like Nginx. It combines performance with modern features like automatic HTTPS, HTTP/2 and HTTP/3 support and built-in worker support. It is based on the Caddy Server. The Caddy Server is a modern, lightweight web server with automatic HTTPS configuration, known for its simplicity and security.

I have been running it in the test environment for several months now. Everything runs very well and fast. It has also passed various stress tests.

My question now is whether anyone is using FrankenPHP as a web server in a production environment and if anyone can tell me about their experience with it. It is very stable in the development environment and very easy to configure.

Instead of maintaining a web server (nginx, lighttpd), a PHP manager like FPM and the PHP itself, the FrankenPHP server does it all in one.

What I am missing is some experience. I would be happy if someone could report on this. I am considering using it here in production because FrankenPHP is much easier to maintain, the processes seem to be better managed than FPM and we are no longer tied to the PHP version of the system. Currently FrankenPHP uses PHP version 8.4.

I am curious to see if anyone is already using it face-smile
Frank-avatar
Frank 9 days ago
General
Behind the Scenes: SEO Measures for a Better User Experience
Hello Users,

Due to recent SEO changes at Google, our editorial team and developers are working intensively on new SEO measures for all our portals. During this phase, we will temporarily publish few to no new content.

We are working with the tools Semrush and SearchAtlas to accomplish this.

However, this doesn't mean you can't use the forum! Please continue to ask your questions and interact with other users. The forum thrives on your contributions!

We'll be back at full strength for you soon.

Regards,
Frank
Frank-avatar
Frank 17 days ago
General
On the Security of the Signal App in the Context of the Current US Leak
Hello User,

Currently, there's much discussion about the USA leak, in which high-ranking officials of the Trump administration, including Vice President J.D. Vance, Defense Secretary Pete Hegseth, CIA Director John Ratcliffe, and Security Advisor Michael Waltz, discussed militarily sensitive information about the Houthi militias via the Signal messaging app.

In the media, instead of the content there is increasing coverage about the security of the Signal app. From my perspective, this is misleading. Currently, there are no security concerns or known security vulnerabilities in the app itself.
Regardless of the discussed content (Europeans are "freeloaders" etc.), the Signal app should not suffer from this carelessness.

The security issues are rather with the users' smartphones and not the app itself. This aspect is unfortunately being overlooked in media reports. In fact, there is currently no security vulnerability or exploit for the Signal app.

The warning from the US Department of Defense about the leak is also frequently misinterpreted. This is merely about phishing QR codes for linked devices. This does not represent a security vulnerability in Signal itself, but describes the possibility of introducing a foreign QR code for pairing into an already compromised operating system, so that this device can read along with the messages. So this is about the pairing process, but with a QR code that doesn't come from your own device but from hackers. Here again, the security of the system or smartphone plays a role and not that of the Signal app.

There is currently no evidence that Signal is insecure or has a security vulnerability. I consider the US Department of Defense's warning regarding QR codes for pairing to be a diversionary tactic. This method would only work anyway if the corresponding smartphone itself had already been compromised.

If Signal is run on a secured device (and not on an outdated Android without updates or similar), no hacker in the world can decrypt these messages at the current time.

Regardless of what guidelines the US Department of Defense has for using communication tools or devices, communication within Signal was technically secure at all times.

The fact that a press representative from "The Atlantic" was invited to the conversations did not affect the technical security. Content security is another issue – however, the Signal app cannot be blamed for this. This is a human failure, not a technical one.

The question of whether the Signal app is secure can be answered with a clear "Yes" at the current time. On appropriately protected devices (with current updates), it is the most secure messaging app we currently have, even if many media are currently portraying this incorrectly.

I have been working with Signal for years. Here are some facts about it:

  • Signal uses end-to-end encryption, which is considered particularly secure. Messages can only be read by the sender and recipient; not even Signal itself has access to the content.
  • The Signal Protocol (formerly Axolotl Protocol) is a cryptographic communication protocol for end-to-end encrypted message exchange, which is considered the "industry or gold standard" in instant messaging. It was later integrated in modified form into various other messengers such as WhatsApp, Wire, Conversations, etc.
  • The app offers Perfect Forward Secrecy, which means that even if a long-term key is compromised, previous messages cannot be decrypted.
  • Signal is completely Open Source, which means that the entire source code is publicly available and can be reviewed by experts.
  • The app uses encrypted user profiles and does not store phone contacts or metadata on its servers.
  • Signal offers additional security features such as the ability to verify security numbers to prevent man-in-the-middle attacks.
  • Signal is funded as a non-profit organization through donations and places great emphasis on data privacy and security. The "Signal Foundation" is a non-profit organization. Signal Messenger LLC is a wholly owned subsidiary of the Signal Foundation and is responsible for the technical development of the messenger.
  • Currently, there are no known security vulnerabilities in the Signal app itself.

If you have questions about this, feel free to ask them here.

Regards,
Frank
Frank-avatar
Frank 25 days ago
Tutorial
How to install lsyncd directory synchronisation on Ubuntu LTS

As a developer, sometimes you need to synchronize a directory multiple times simultaneously, e.g., when a new file is written to the directory. And of course, this should happen in (near) real-time without significant delay. This is common in web development.

Here's my resource-efficient solution for multiple synchronization, e.g. from directory /srv/www/original/src to web1 and simultaneously to web2:

/srv/www/original/src
    sync to -> /srv/www/web1/src/ 
    sync to -> /srv/www/web2/src/

For synchronization, I use the tool lsyncd (Live Syncing Daemon). It's available for almost every Linux distribution and macOS.

back-to-topWhat is lsyncd?


Lsyncd (Live Syncing Daemon) is a powerful tool for real-time synchronization of directories on Linux and macOS systems. Unlike conventional synchronization tools like rsync, lsyncd continuously monitors changes in your directories and synchronizes them in near real-time. It uses the inotify subsystem of the Linux kernel to detect filesystem events and triggers synchronization only when actual changes occur, making it particularly resource-efficient.

back-to-topInstallation


sudo apt install lsyncd    # Debian/Ubuntu
systemctl enable lsyncd

Test the installation:
lsyncd --version

Example output:
Version: 2.2.3

back-to-topConfiguration


Since there is no sample configuration in "/etc" after installation, we first need to find out what it's called on Ubuntu. You can find this information in "/etc/init.d/lsyncd".
cat /etc/init.d/lsyncd | grep CONFIG=

Example output:
CONFIG=/etc/lsyncd/lsyncd.conf.lua

On Ubuntu, the configuration file is: /etc/lsyncd/lsyncd.conf.lua (on Fedora: /etc/lsyncd.conf). Now let's create the configuration file:
vi /etc/lsyncd/lsyncd.conf.lua

In the following example, the directories: css/ and js/ are excluded.
settings {
    logfile = "/var/log/lsyncd.log",  
    statusFile = "/var/log/lsyncd-status.log"  
}
-- Synchronize directories
sync {
    default.direct,
    source = "/srv/www/original/src/",  
    target = "/srv/www/web1/src/",  
    delay = 1,
    exclude = {"css/*", "js/*"}  
}
sync {
    default.direct,
    source = "/srv/www/original/src/",  
    target = "/srv/www/web2/src/",  
    delay = 1,
    exclude = {"css/*", "js/*"}  
}

back-to-topInitial Synchronization


To avoid having everything synchronized with "lsyncd" during the first synchronization, we start with an initial synchronization using "rsync" to populate the directories. This is faster.

mkdir /srv/www/web1/src/
rsync -av --delete --exclude="css/" --exclude="js/" /srv/www/original/src/ /srv/www/web1/src/  
mkdir /srv/www/web2/src/
rsync -av --delete --exclude="css/" --exclude="js/" /srv/www/original/src/ /srv/www/web2/src/  

back-to-topStart with the new configuration:


sudo systemctl restart lsyncd

Status:
sudo systemctl status lsyncd

Example output:
● lsyncd.service - LSB: lsyncd daemon init script
     Loaded: loaded (/etc/init.d/lsyncd; generated)
     Active: active (running) since Tue 2025-03-18 12:44:25 CET; 3h 22min ago
       Docs: man:systemd-sysv-generator(8)
    Process: 246897 ExecStart=/etc/init.d/lsyncd start (code=exited, status=0/SUCCESS)
      Tasks: 1 (limit: 115371)
     Memory: 512.0M
        CPU: 3.791s
     CGroup: /system.slice/lsyncd.service
             └─246905 /usr/bin/lsyncd -pidfile /var/run/lsyncd.pid /etc/lsyncd/lsyncd.conf.lua

Mar 18 12:44:25 ares systemd[1]: Starting LSB: lsyncd daemon init script...
Mar 18 12:44:25 ares lsyncd[246897]:  * Starting synchronization daemon lsyncd
Mar 18 12:44:25 ares lsyncd[246904]: 12:44:25 Normal: --- Startup, daemonizing ---
Mar 18 12:44:25 ares lsyncd[246897]:    ...done.
Mar 18 12:44:25 ares systemd[1]: Started LSB: lsyncd daemon init script.

back-to-topMonitoring and Status


Check logfile:
tail -f /var/log/lsyncd.log

Status:
tail -f /var/log/lsyncd-status.log

back-to-topConclusion


Lsyncd offers excellent performance for synchronizing directories in near real-time. Through event-based monitoring, changes are detected immediately and synchronized with minimal delay, making it ideal for development environments and production servers. Resource usage remains minimal since synchronization only occurs when actual changes happen. Synchronization works not only locally but can also be set up between servers. For web developers working with multiple servers or directories, lsyncd is an indispensable tool that saves you a lot of manual work and ensures consistent data across multiple systems.

If you have questions or additions, simply write a comment here.

Regards,
Frank
Frank-avatar
Frank 27 days ago
Tutorial
Resolving Standby Problems Caused by USB Devices on Fedora Linux 41

back-to-topIntroduction


Sometimes on Linux systems, certain USB devices can wake the computer from standby mode or prevent it from entering standby mode at all. In this tutorial, I'll show you how to identify problematic USB devices and disable their wake-up functionality. As an example, I'll use a Logitech Logi Bolt Receiver with a Logitech MX Mechanical keyboard - a combination that frequently causes standby problems.

P.S. The Logitech MX Mechanical Keyboard (Amazon affiliate link) is one of the best mechanical keyboards I know. All the Linux and Windows computers in the editorial and administration departments are equipped with it. Have a look at them.

back-to-topStep 1: Identify ACPI Devices with Wake-up Capability


First, you need to find out which ACPI devices can wake your computer from sleep:
cat /proc/acpi/wakeup

Example output:
Device	S-state	  Status   Sysfs node
GPP0	  S4	*enabled   pci:0000:00:01.1
GPP1	  S4	*disabled
GPP3	  S4	*disabled
GPP4	  S4	*disabled
GPP5	  S4	*disabled
GPP6	  S4	*disabled
GPP7	  S4	*disabled
GPP8	  S4	*enabled   pci:0000:00:03.1
GPP9	  S4	*disabled
GPPA	  S4	*disabled
GPPB	  S4	*disabled
GPPC	  S4	*disabled
GPPD	  S4	*disabled
GPPE	  S4	*disabled
GPPF	  S4	*disabled
GP10	  S4	*disabled
GP11	  S4	*disabled
GP12	  S4	*enabled   pci:0000:00:07.1
GP13	  S4	*enabled   pci:0000:00:08.1
XHC0	  S4	*enabled   pci:0000:0b:00.3
GP30	  S4	*disabled
GP31	  S4	*disabled
PS2K	  S3	*disabled
PS2M	  S3	*disabled
GPP2	  S4	*enabled   pci:0000:00:01.3
PTXH	  S4	*enabled   pci:0000:02:00.0

This output shows:

  • Device: The ACPI device name (e.g., PTXH, XHC0)
  • S-state: The deepest sleep state from which the device can wake up
  • Status: enabled or disabled (indicates whether the device is activated as a wake-up source)
  • Sysfs node: The corresponding path in the sysfs filesystem

back-to-topStep 2: List USB Devices


Next, list all connected USB devices:
lsusb

Example output:
Bus 001 Device 001: ID 1d6b:0002 Linux Foundation 2.0 root hub
Bus 001 Device 003: ID 0a12:0001 Cambridge Silicon Radio, Ltd Bluetooth Dongle (HCI mode)
Bus 001 Device 004: ID 25a7:fa0b Areson Technology Corp 2.4G Wireless Receiver
Bus 001 Device 009: ID 046d:c548 Logitech, Inc. Logi Bolt Receiver
Bus 002 Device 001: ID 1d6b:0003 Linux Foundation 3.0 root hub
Bus 003 Device 001: ID 1d6b:0002 Linux Foundation 2.0 root hub
Bus 003 Device 002: ID 1038:12f6 SteelSeries ApS Arctis Nova 4X
Bus 004 Device 001: ID 1d6b:0003 Linux Foundation 3.0 root hub

back-to-topStep 3: Identify the Problematic Device by Plugging and Unplugging


A practical method to find the problematic device is to systematically plug and unplug individual USB devices:

  1. Remove all non-essential USB devices
  2. Try to put the computer into standby mode
  3. If standby works, reconnect one device at a time and test standby after each connection
  4. Once standby stops working, you've found the problematic device

In this case, using this method identified the Logitech Bolt Receiver as the culprit. To find the specific device in the list:
lsusb | grep -i logitech

Output:
Bus 001 Device 003: ID 046d:c548 Logitech, Inc. Logi Bolt Receiver

Note the Vendor ID (046d) and Product ID (c548), as you'll need these for the udev rules.

back-to-topStep 4: Fix Standby Issues with udev Rules on Fedora Linux 41


On Fedora Linux 41, create udev rules specific to the Logitech Logi Bolt Receiver. Use the tee method to avoid permission issues:
echo 'ACTION=="add", SUBSYSTEM=="usb", ATTRS{idVendor}=="046d", ATTRS{idProduct}=="c548", ATTR{power/wakeup}="disabled"' | sudo tee /etc/udev/rules.d/90-logibolt-disable-wakeup.rules > /dev/null  
echo 'ACTION=="add", SUBSYSTEM=="usb", ATTRS{idVendor}=="046d", ATTRS{idProduct}=="c548", ATTR{power/autosuspend}="0"' | sudo tee /etc/udev/rules.d/91-logibolt-power-management.rules > /dev/null  

After creating the rules, reload the udev rules:
sudo udevadm control --reload
sudo udevadm trigger

Verify udev Rules
To check if the udev rules have been applied, use these commands:
# Find the corresponding USB device path
for device in /sys/bus/usb/devices/*; do
  if grep -q "046d" "$device/idVendor" 2>/dev/null && grep -q "c548" "$device/idProduct" 2>/dev/null; then  
    echo "Logitech Bolt Receiver found at: $device"  
    
    # Check wake-up status
    if [ -f "$device/power/wakeup" ]; then  
      echo "Wake-up status: $(cat $device/power/wakeup)"  
    fi
    
    # Check autosuspend status
    if [ -f "$device/power/autosuspend" ]; then  
      echo "Autosuspend status: $(cat $device/power/autosuspend)"  
    fi
  fi
done

The wake-up status should show "disabled" and the autosuspend status should be "0".

Output:
Logitech Bolt Receiver found at: /sys/bus/usb/devices/1-5
Wake-up status: disabled
Autosuspend status: 0

back-to-topStep 5: Alternative - Systemd Service for the USB Controller


If the udev rules aren't sufficient, you can create a systemd service (also using the tee method):
echo '[Unit]  
Description=Disable Logitech MX Mechanical Bolt Receiver wake-up
After=multi-user.target
[Service]
Type=oneshot
ExecStart=/bin/sh -c "echo PTXH > /proc/acpi/wakeup"  
RemainAfterExit=yes
[Install]
WantedBy=multi-user.target' | sudo tee /etc/systemd/system/disable-logibolt-wakeup.service > /dev/null  

Enable the service so it runs at system startup:
sudo systemctl enable disable-logibolt-wakeup.service

Verify Systemd Service
After a reboot, check if the systemd service ran successfully:
cat /proc/acpi/wakeup | grep PTXH

The output should show "disabled" for the corresponding USB controller:
PTXH	  S4	*disabled   pci:0000:02:00.0

You can also check the service status:
sudo systemctl status disable-logibolt-wakeup.service

back-to-topConclusion


With these methods, you can prevent the Logitech MX Mechanical keyboard with the Logi Bolt Receiver from waking your computer from standby mode on Fedora Linux 41. The udev rules are the preferred method as they target specific devices, while the systemd service method affects the entire USB controller.

The ultimate test is whether your computer now enters and remains in standby mode without unwanted wake-ups.

Important note: After implementing these solutions, you will no longer be able to wake your computer using the keyboard connected to the Logitech Bolt Receiver. You will need to use another device, such as your mouse or the power button (configured to trigger standby mode via Gnome Settings -> Power -> Power Button Behavior: Suspend), to wake your computer from standby.
Frank-avatar
Frank 27 days ago
2 comments
Comment: Linux NetworkManager - Adding a search domain using nmcli or nmtui
Yes, of course you can. I have added it above. The configuration will then look something like this (but I am a fan of the vi editor):

vi /etc/NetworkManager/system-connections/'Wired connection 1.nmconnection'  

[connection]
id=Wired connection 1
uuid=c0718bbc-fa2b-3be2-a863-4d946ffa16ff
type=ethernet
autoconnect-priority=-999
interface-name=enp5s0
timestamp=1740436074

[ethernet]

[ipv4]
dns=192.168.0.1;
dns-search=searchdomain.tld;
method=auto

[ipv6]
addr-gen-mode=default
method=auto

[proxy]

Simply change the 'dns-search=searchdomain.tld;' accordingly and restart the NetworkManager:
systemctl restart NetworkManager

greetings
Frank face-smile
Frank-avatar
Frank 28 days ago
Information
Windows 11 Download (ISO, Media Creation Tool)
Windows 11 is Microsoft's latest operating system and offers numerous improvements over Windows 10. In this guide, you'll learn how to download and install Windows 11 for free. You can do this directly with the ISO file or with the Media Creation Tool.


back-to-topCurrent Version: Windows 11 2024 Update (Version 24H2)


Microsoft recently released the Windows 11 2024 Update (Version 24H2). This version brings numerous improvements and new features. Before starting the installation, you should check the Windows release information to identify known issues that might affect your device.

back-to-topMethods for Windows 11 Download


There are various ways to install Windows 11 or create Windows 11 installation media. We present the three official methods:

back-to-top1. Windows 11 Installation Assistant


The Windows 11 Installation Assistant is the easiest way to install Windows 11 on your device. This option is ideal for users who want to upgrade directly from Windows 10 to Windows 11.

Prerequisites:

  • You need a Windows 10/11 license
  • Your PC must have Windows 10, version 2004 or higher installed
  • At least 9 GB of free storage space to download Windows 11
  • Your PC must meet the Windows 11 device specifications

Installation steps:

  1. Download the Installation Assistant
  2. Run the file as administrator
  3. Accept the license terms
  4. Click on "Accept and install"
  5. After preparation is complete, click on "Restart now"

Please note: The Windows 11 Installation Assistant does not run on Arm-based PCs, only on PCs with x64 processors.

back-to-top2. Create Windows 11 Installation Media (Media Creation Tool)


If you want to install Windows 11 on another PC or want to perform a clean installation, the Media Creation Tool is a good choice. With this tool, you can create a bootable USB drive or DVD.

Prerequisites:

  • A Windows 10/11 license or a Windows 10 device eligible for upgrade
  • Internet connection
  • A USB drive with at least 8 GB of storage space or a blank DVD with at least 8 GB
  • A PC with a 64-bit CPU that meets the Windows 11 system requirements

Steps to create installation media:

  1. Download the Media Creation Tool and run it as administrator
  2. Accept the license terms
  3. Select "Create installation media for another PC"
  4. Choose language, edition, and architecture (64-bit) for Windows 11
  5. Select the media type:
    • USB drive: Connect an empty USB drive
    • ISO file: Save the ISO file on your PC to burn it to a DVD later

Important: If your PC doesn't meet the minimum requirements, it will lose support and won't receive updates after installing Windows 11.

back-to-top3. Download Windows 11 ISO File Directly


For experienced users, directly downloading the ISO file is the best choice. This also applies if you want to install Windows 11 in a virtual machine like VirtualBox.

The Windows 11 ISO file contains both versions - Windows 11 Home and Windows 11 Pro. Which version gets installed depends on your product key.

After downloading the ISO file, you have the following options:

  • Burn the ISO to a DVD using programs like Nero or CDBurnerXP
  • Create a bootable USB drive using tools like Rufus
  • Use the ISO for virtual machines

back-to-topWindows 11 Installation without TPM 2.0


Microsoft has set strict system requirements for Windows 11, including a Trusted Platform Module (TPM) version 2.0. This security chip is located on the motherboard or in your PC's processor. If it's not present, a standard installation is not possible.

However, you can bypass this restriction with the Rufus tool:

1. Download Rufus
2. Select "Extended Windows 11 Installation (no TPM / no Secure Boot)" under "Image option"
3. Create a bootable USB drive with the Windows 11 ISO

back-to-topSystem Requirements for Windows 11


Before starting the Windows 11 download, you should ensure that your PC meets the minimum requirements:

  • Processor: 1 GHz or faster with at least 2 cores on a compatible 64-bit processor
  • RAM: at least 4 GB
  • Storage space: at least 64 GB
  • System firmware: UEFI, Secure Boot capable
  • TPM: Version 2.0
  • Graphics card: DirectX 12 or higher with WDDM 2.0 driver
  • Display: Larger than 9 inches with HD resolution (720p)
  • Internet connection: Windows 11 Home edition requires a Microsoft account and internet connection

Here are the current system requirements:


Check for compatibility


Here are the Windows 11 CPU requirements


back-to-topNew Features in Windows 11


Windows 11 brings many improvements over Windows 10:

  • A completely new design with a centered Start menu
  • Redesigned taskbar with new functions
  • Widgets that display personalized information
  • Improved security through TPM 2.0 requirement
  • Microsoft Teams integration instead of Skype
  • Microsoft Edge replaces Internet Explorer
  • New themes for light and dark mode
  • Improved productivity features

back-to-topBackup Data Before Installation


Before you begin installing Windows 11, be sure to back up your important data. A clean installation will delete all data on the hard drive.

You can back up your data through:

  • External hard drive
  • Cloud storage
  • Backup software

back-to-topFrequently Asked Questions about Windows 11 Download


Is downloading Windows 11 free?
Downloading the ISO file is free. However, you need a valid license to use Windows 11. If you already own Windows 10, you can upgrade to Windows 11 for free.

Can I download Windows 11 without the Media Creation Tool?
Yes, you can download the ISO file directly without using the Media Creation Tool.

How do I load Windows 11 onto a USB drive?
You can use the Media Creation Tool or other tools like Rufus to create a bootable USB drive.

Until when will Windows 10 be supported?
Microsoft will end support for Windows 10 in October 2025, including security updates.

back-to-topTroubleshooting Installation Problems


Sometimes problems can occur during the installation of Windows 11. Here are some common problems and their solutions:

The PC doesn't boot from USB or DVD:
If your PC doesn't automatically boot from the installation media, you need to open the boot menu. You may also need to change the boot order in the BIOS or UEFI settings. Depending on the motherboard manufacturer, press F2, F12, Del, or Esc during system startup.

"This PC can't run Windows 11":
This message appears when your system doesn't meet the minimum requirements. In this case, you can upgrade the hardware. Alternatively, you can use the Rufus method to bypass the TPM and Secure Boot requirements.

Slow download speed:
If the ISO file downloads slowly, try at different times. Choose times when fewer people are using the network. You can also use a download manager that can resume interrupted downloads.

back-to-topConclusion


Windows 11 offers numerous improvements over its predecessor. With the various download options, you can choose the best method for installing Windows 11. These include the Windows 11 Installation Assistant, the Media Creation Tool, and the direct ISO file.

Before installation, make sure your PC meets the system requirements. Back up your data to avoid loss. With the right preparation, installing Windows 11 will be a smooth process.

Have fun with Windows 11 face-wink
aqui-avatar
aqui 28 days ago
2 comments
Comment: Linux NetworkManager - Adding a search domain using nmcli or nmtui
You can use the nmcli for the "search domain" setting, or the simpler nmtui with a shell GUI
You can also edit your connection under /etc/NetworkManager/system-connections/ and add the dns-search command with the nano editor.
There are always many roads to Rome... face-wink
Frank-avatar
Frank 31 days ago
Tutorial
CORS: Configure Cross-Origin Resource Sharing
Hello user, today I had the pleasure of working with CORS.


back-to-topWhat is CORS?


Cross-Origin Resource Sharing (CORS) allows external web browsers or other web clients to access certain data on your own web server. This is usually prohibited by the Same-Origin-Policy (SOP). This usually involves web APIs and data sharing.

Since we don't share our data with anyone, it wasn't clear to me why we needed a CORS rule for this. As always, everything can be manipulated and hackers recommend that you set CORS so that you can load your content yourself. If you visit hacker sites, you will quickly find the topic: "Vulnerability: CROSS ORIGIN RESOURCE SHARING".

The recommendations of the hacker community are therefore as follows:
Rather than using a wildcard or programmatically verifying supplied origins, use a whitelist of trusted domains.

General information about CORS can be found at the following links:


back-to-topHow do you test for CORS?


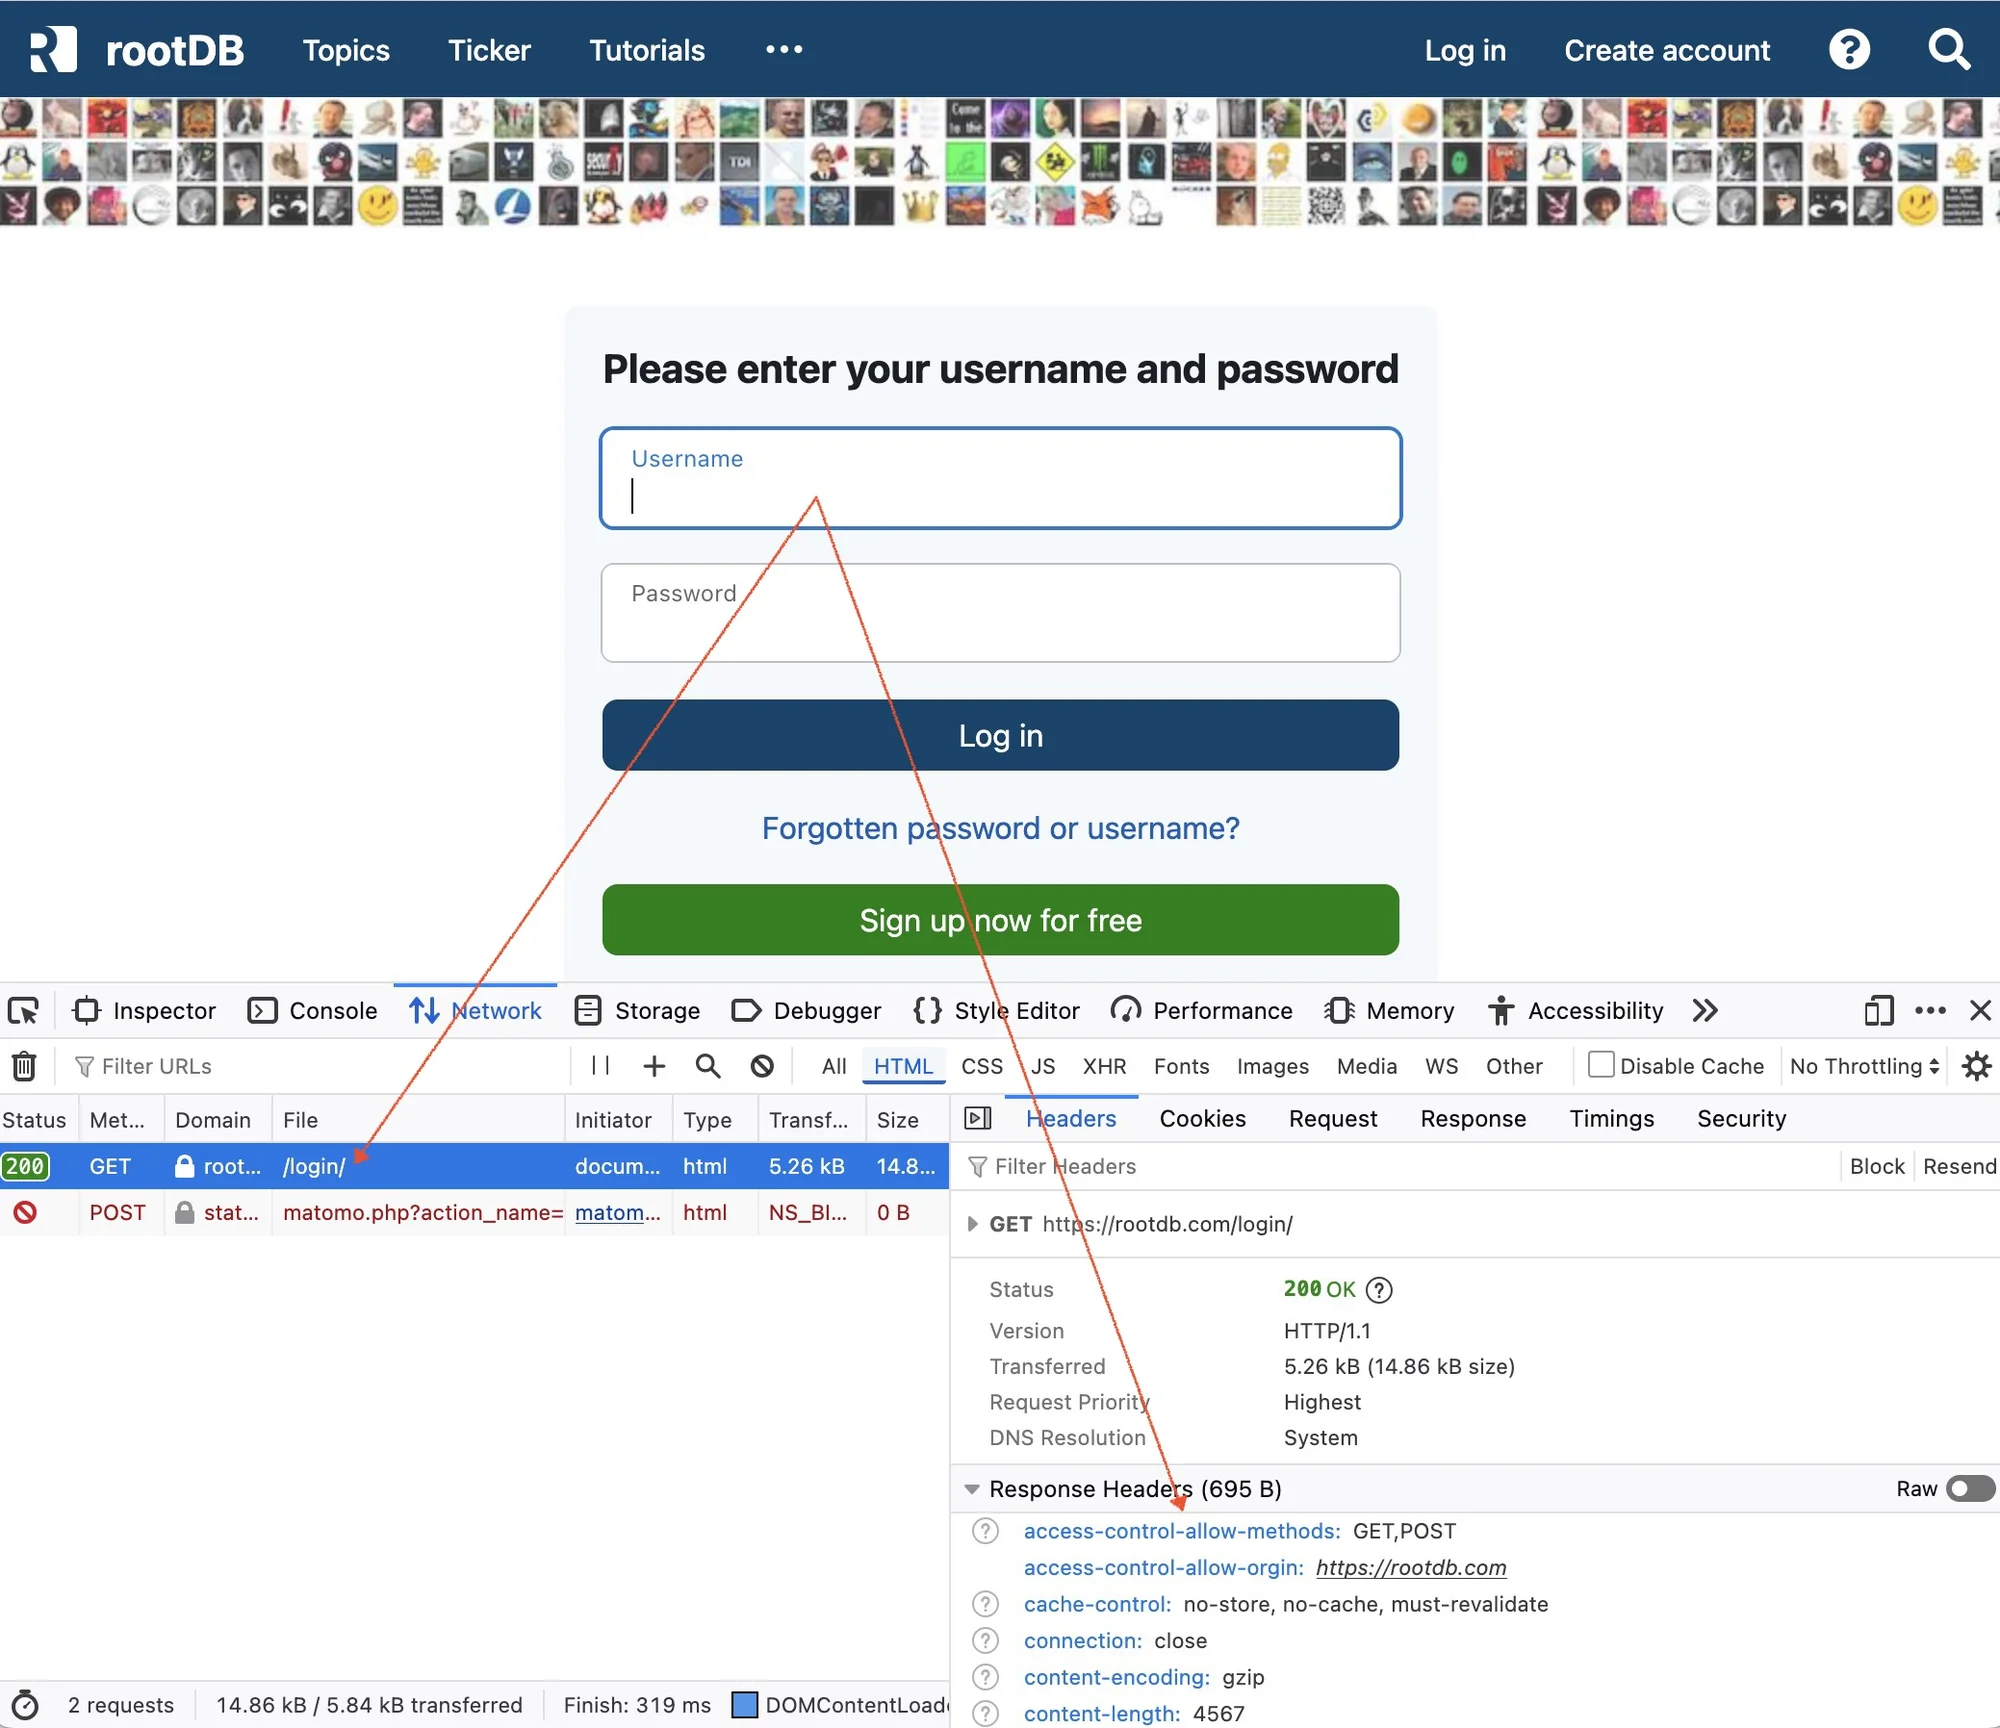
You can go to the desired page in the browser and launch the browser's developer tools, e.g. via the "Examine Element" menu (e.g. Firefox on the Mac: option+cmd+i). After clicking on the page, you will find the corresponding header under Network Analysis. Here is an example:

bildschirmfoto 2025-03-12 um 18.44.36

Of course, this can vary from browser to browser and system to system, but in the end, all browsers have a similar view.

It is easier, for example, to use curl in the console:
curl -I -X OPTIONS -H "Origin: https://DOMAIN.TLD" -H 'Access-Control-Request-Method: GET' https://DOMAIN.TLD/index.php 2>&1 | grep 'Access-Control-Allow-Origin'  

Tip: If you are on a development system with an invalid SSL certificate, you need to add a "-k" as a curl option (e.g. curl -k -I -X OPTIONS -H ....). This will suppress the invalid certificate face-smile

Both methods should have the following in the header:
Access-Control-Allow-Origin: https://DOMAIN.TLD

If "Access-Control-Allow-Origin" is present, CORS is controlled. Of course there can also be a "*" in it. This allows all access from other servers. You can usually find this in public APIs.

back-to-topHow do I set CORS?


This can be done in several ways: Through the proxy, in the web server, or through a script. For example, if you have a HAProxy and want to enable CORS in general, all you need to do is add a few lines of code to your config:

frontend http_front
    bind *:80
    
    # CORS headers
    http-response set-header Access-Control-Allow-Origin "https://your-domain.com"  
    http-response set-header Access-Control-Allow-Methods "GET, POST, OPTIONS, PUT, DELETE"  
    http-response set-header Access-Control-Allow-Headers "Origin, X-Requested-With, Content-Type, Accept, Authorization"  
    http-response set-header Access-Control-Max-Age "3600"  
    
    # Optional: Handle OPTIONS preflight requests
    acl cors_preflight method OPTIONS
    http-request return status 204 if cors_preflight
    
    default_backend web_servers

backend web_servers
    server server1 127.0.0.1:8080 check

back-to-topDisadvantage - Advertising systems are blocked


But this has a big disadvantage. Sites that rely on advertising have the problem that all advertising systems and their javascripts are immediately blocked. The prerequisite for this is, of course, that you enter your own domain and not the "*". So this is not the solution for us (safe, but impractical).

back-to-topSet via HEADER


So you should tweak it. For example, for us, this would be the login, the settings pages, the news pages, etc. This is the members area. Since there is no advertising displayed there anyway, we can start here.

In PHP, it is very easy to set the page HEADER, so we do not need to intervene in the configuration of the proxy or the web server. A simple:
header("Access-Control-Allow-Orgin: https://rootdb.com");  
header("Access-Control-Allow-Methods: GET,POST");  

on the respective pages is sufficient to set security via CORS. You should then check it again in the browser or via curl. If you did everything correctly, you should see
Access-Control-Allow-Origin: https://rootdb.com
and everything is fine. Of course, this works with all languages that can set a HEADER.

I hope I could help some web developers with this. The topic is complex, but can be implemented quite easily.

Greetings
Frank
Frank-avatar
Frank 31 days ago
Tutorial
Modifying the Hosts file in Mac OS X
Frequently asked, here is my mini tutorial on it.

How do I change the 'hosts' file under macOS (from 10.5 Leopard to 15.3.1 Sequoia) to link an internal IP address with a DNS name?

There is a file called 'hosts' in the '/etc/' directory. This file has to be accessed with administrator rights. This is done in the 'Terminal' application using the 'sudo' command.

sudo nano /etc/hosts

The "nano" text editor is used here. You can also use the "vi" or "vim" editor (sudo vi /etc/hosts).
After the password prompt, the contents of the "hosts" file will appear:

##
# Host Database
#
# localhost is used to configure the loopback interface
# when the system is booting.  Do not change this entry.
##
127.0.0.1       localhost
255.255.255.255 broadcasthost
::1             localhost

You can now add your own entries. Example:

##
# Host Database
#
# localhost is used to configure the loopback interface
# when the system is booting.  Do not change this entry.
##
127.0.0.1       localhost
255.255.255.255 broadcasthost
::1             localhost

192.168.0.1 www.mydomain.com
192.168.0.2 mymac

Save the file (in nano: Ctrl->X and then enter Y to save) and then execute the command:

dscacheutil -flushcache
This command will update the existing DNS cache.

You can now 'ping' to test the internal name resolution.

# ping mymac
PING mymac (192.168.0.2): 56 data bytes
64 bytes from 192.168.0.2: icmp_seq=0 ttl=64 time=0.155 ms
64 bytes from 192.168.0.2: icmp_seq=1 ttl=64 time=0.166 ms

That's it face-smile

Greetings Frank
brg3466-avatar
brg3466 34 days ago
brg3466 has registered
Focus: Internet/Cloud - User group: End-user.
Frank-avatar
Frank 38 days ago
Tutorial2 comments
Linux NetworkManager - Adding a search domain using nmcli or nmtui
Actually, I just want to add my search domain to the network settings (search domain or dns search) under Arch-Linux and Fedora. This used to be very easy via Settings -> Network. Unfortunately, this was removed from the settings at some point. My environment is Gnome 43.3 and 46.

Like many other Linux distributions, my Arch or Fedora Linux is managed via the Network Manager. So this tip applies to all those who manage their network via NetworkManager (nmcli) (Ubuntu with ifupdown, Debian, Fedora, etc.).

The nmcli and nmtui commands are installed by default on both Linux systems. If you do not have at least nmcli installed, you are not using NetworkManager. You can use the nmcli for the "search domain" setting, or the simpler nmtui with a shell GUI.

Tested with:
  • Endeavor Arch Linux (Gnome 43.3)
  • Fedora 40, 41 (Gnome 46,47)

back-to-topnmcli


sudo nmcli con show
NAME                         UUID                                  TYPE      DEVICE 
Wired connection 1  7708dd93-ea55-398a-9dd1-b5be2c65d4b6  ethernet  enp4s0 
lo                           e6140168-f933-434b-883b-8095ee9b9488  loopback  lo     

sudo nmcli con mod 'Wired connection 1' ipv4.dns-search "searchdomain.tld"  

With the command:
sudo nmcli con show 'Wired connection 1' | grep dns-search  
or
resolvectl
you can then check the settings.

Than restart the NetworkManager.

You can also change the configuration without using the nmcli command by simply editing the appropriate config file (e.g. using the vi editor):

vi /etc/NetworkManager/system-connections/'Wired connection 1.nmconnection'  

[connection]
id=Wired connection 1
uuid=c0718bbc-fa2b-3be2-a863-4d946ffa16ff
type=ethernet
autoconnect-priority=-999
interface-name=enp5s0
timestamp=1740436074

[ethernet]

[ipv4]
dns=192.168.0.1;
dns-search=searchdomain.tld;
method=auto

[ipv6]
addr-gen-mode=default
method=auto

[proxy]
Simply change the 'dns-search=searchdomain.tld;' accordingly and restart the NetworkManager.

You must restart NetworkManager each time you make a change:
systemctl restart NetworkManager

back-to-topnmtui


Fedora Install:
sudo dnf install nmtui

Start nmtui:
[root@frank-endeavour ~]# nmtui

1) Select Edit connection
2) Select IPv4 configuration “Display”
3) Enter the relevant domain under “Search domains” and then select “OK”.

back-to-topUpdate for Ubuntu


In newer versions of Ubuntu, the Network Configuration Abstraction Layer Netplan runs to provide the network (from version 20.04 for a new installation). When upgrading, the old network configuration is simply carried over. Under 'Netplan', the file '/etc/network/interfaces' is unfortunately no longer available (ifupdown has been replaced by netplan).

This is the 'Search Domain' configuration under 'Netpan':

vi /etc/netplan/00-installer-config.yaml

network:
    ethernets:
        enp4s0:
            addresses:
            - 192.168.0.4/24
            dhcp4: false
            gateway4: 192.168.0.1
            nameservers:
                addresses:
                - 192.168.0.1
                search:
                - searchdomain.tld
    version: 2

followed by one:

sudo netplan generate
sudo netplan apply

That's all face-smile
Frank-avatar
Frank 40 days ago
4 comments
Comment: Not finding any of our posts in Google or other search engines
Hi,

what can I say, somehow the Google system doesn't seem to be working properly anymore.

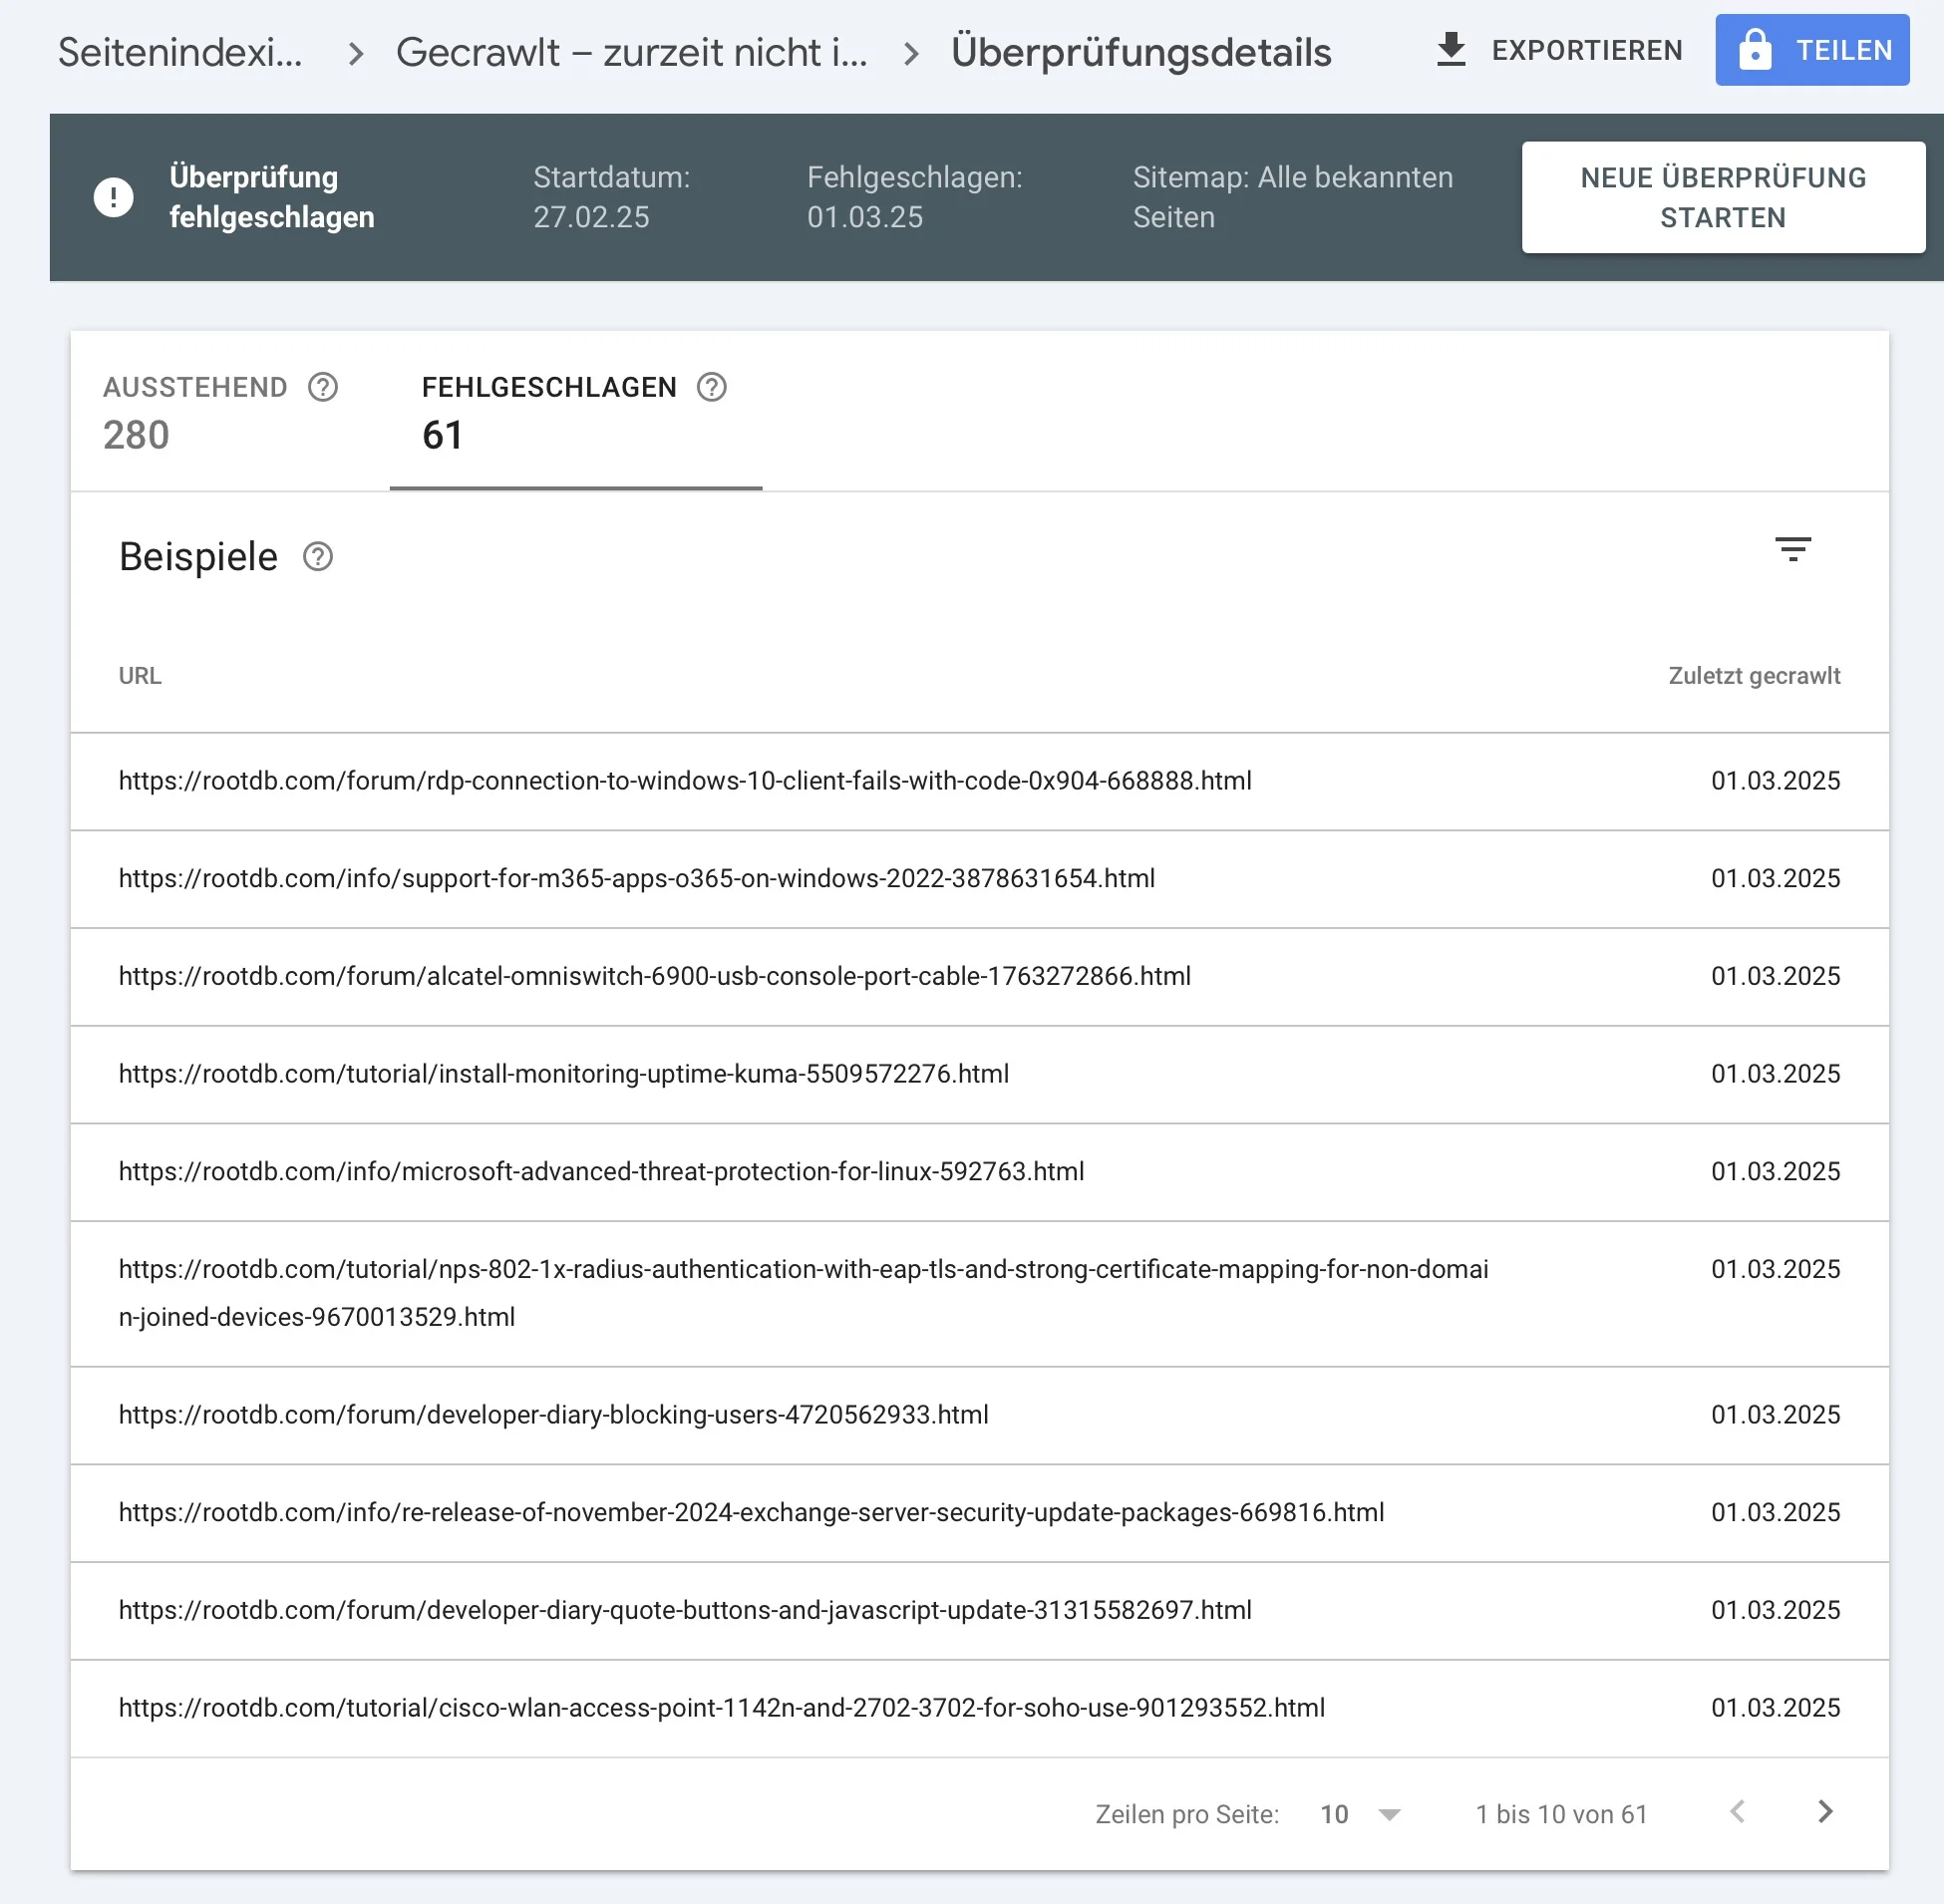
For example, here is the result of the first check: 'crawled - not currently indexed'.

It says 61 failed, but not why or how. Of course, all the URLs are accessible without errors, and if you check them one by one, they are indexable and without errors.

bildschirmfoto 2025-03-04 um 13.10.22

So why did the check fail? Nobody knows except Google. All the explanations in their own help pages are meaningless and do not apply to our pages (e.g. not all 1000 nestings, etc.).

I started the check again in the hope that it would work better the second time. But I don't really think it will.

face-sad
colinardo-avatar
colinardo 40 days ago
4 comments
Comment: Not finding any of our posts in Google or other search engines
That's really wierd, yesterday I noticed one additional result of rootdb.com in the search results (in total 6, and only one of them real content from a post). It was an older english article from myself. And today, this page is gone again , wtf are you doing Google 😵‍💫😕. Some dumb KI doing the job now ...?!
colinardo-avatar
colinardo 43 days ago
4 comments
Comment: Not finding any of our posts in Google or other search engines
Thank you for the detailed insight! Have not done SEO for some time now, so i am not up to date regarding this topic.
So just pray, wait and see ... But i can really imagine how frustrating this must be, so much work from your side not paying of and the content from us as well. Hopefully the time will fix it. *Pressing both thumbs*.
Frank-avatar
Frank 43 days ago
4 comments
Comment: Not finding any of our posts in Google or other search engines
Hello @colinardo,

I don't think Google likes us. To be honest, I don't know why our pages are not indexed by Google.

You wouldn't believe how frustrating it is when Google doesn't even index the English content on Administrator.de.

It works perfectly with the other portals that use the same programming. For example, the portal benutzer.de Portal, which I started at the same time as rootDB, now has all its articles indexed. There are five of them here.

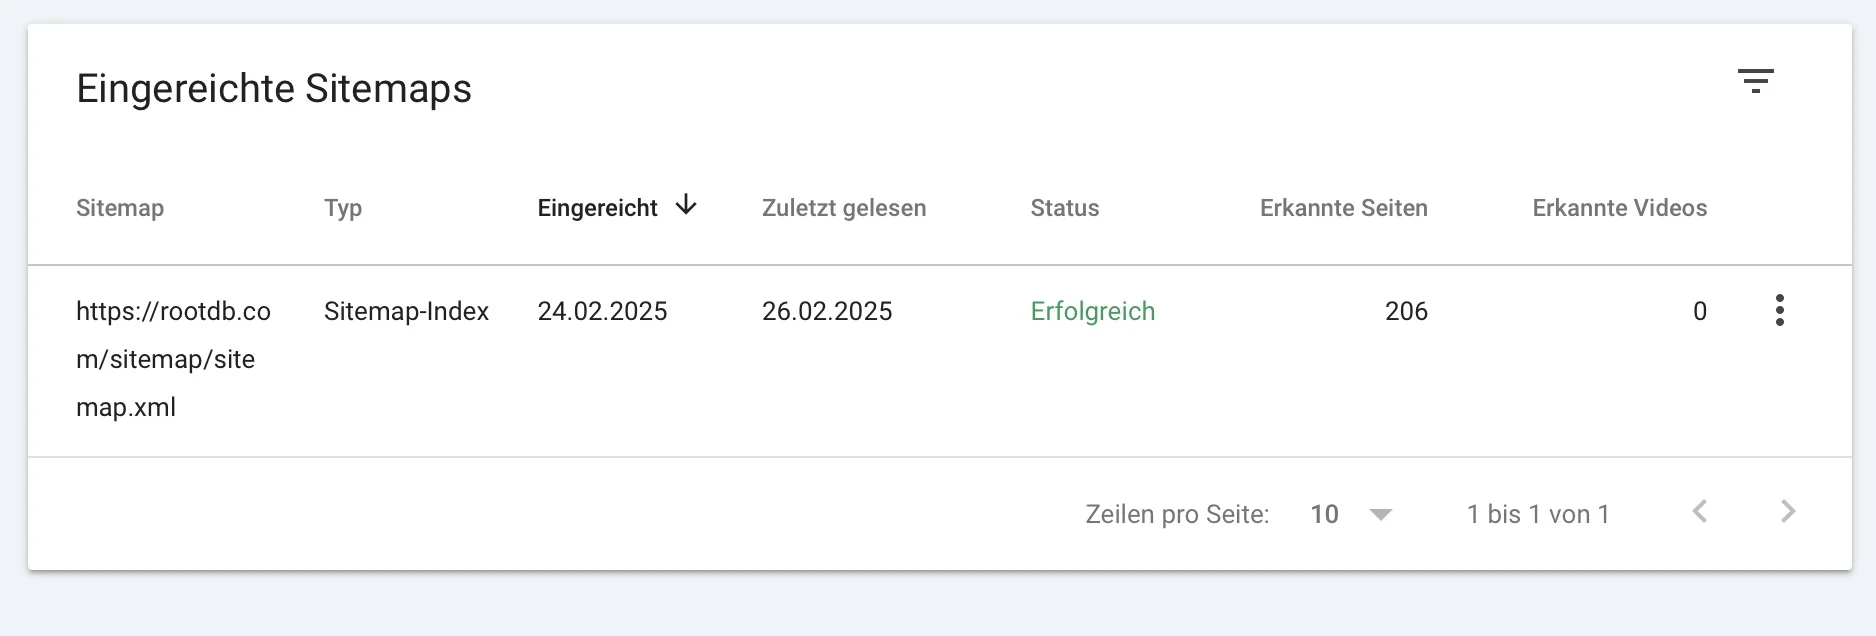
We have a sitemap that reports no errors and has been successfully crawled by Google:

bildschirmfoto 2025-02-28 um 16.31.13

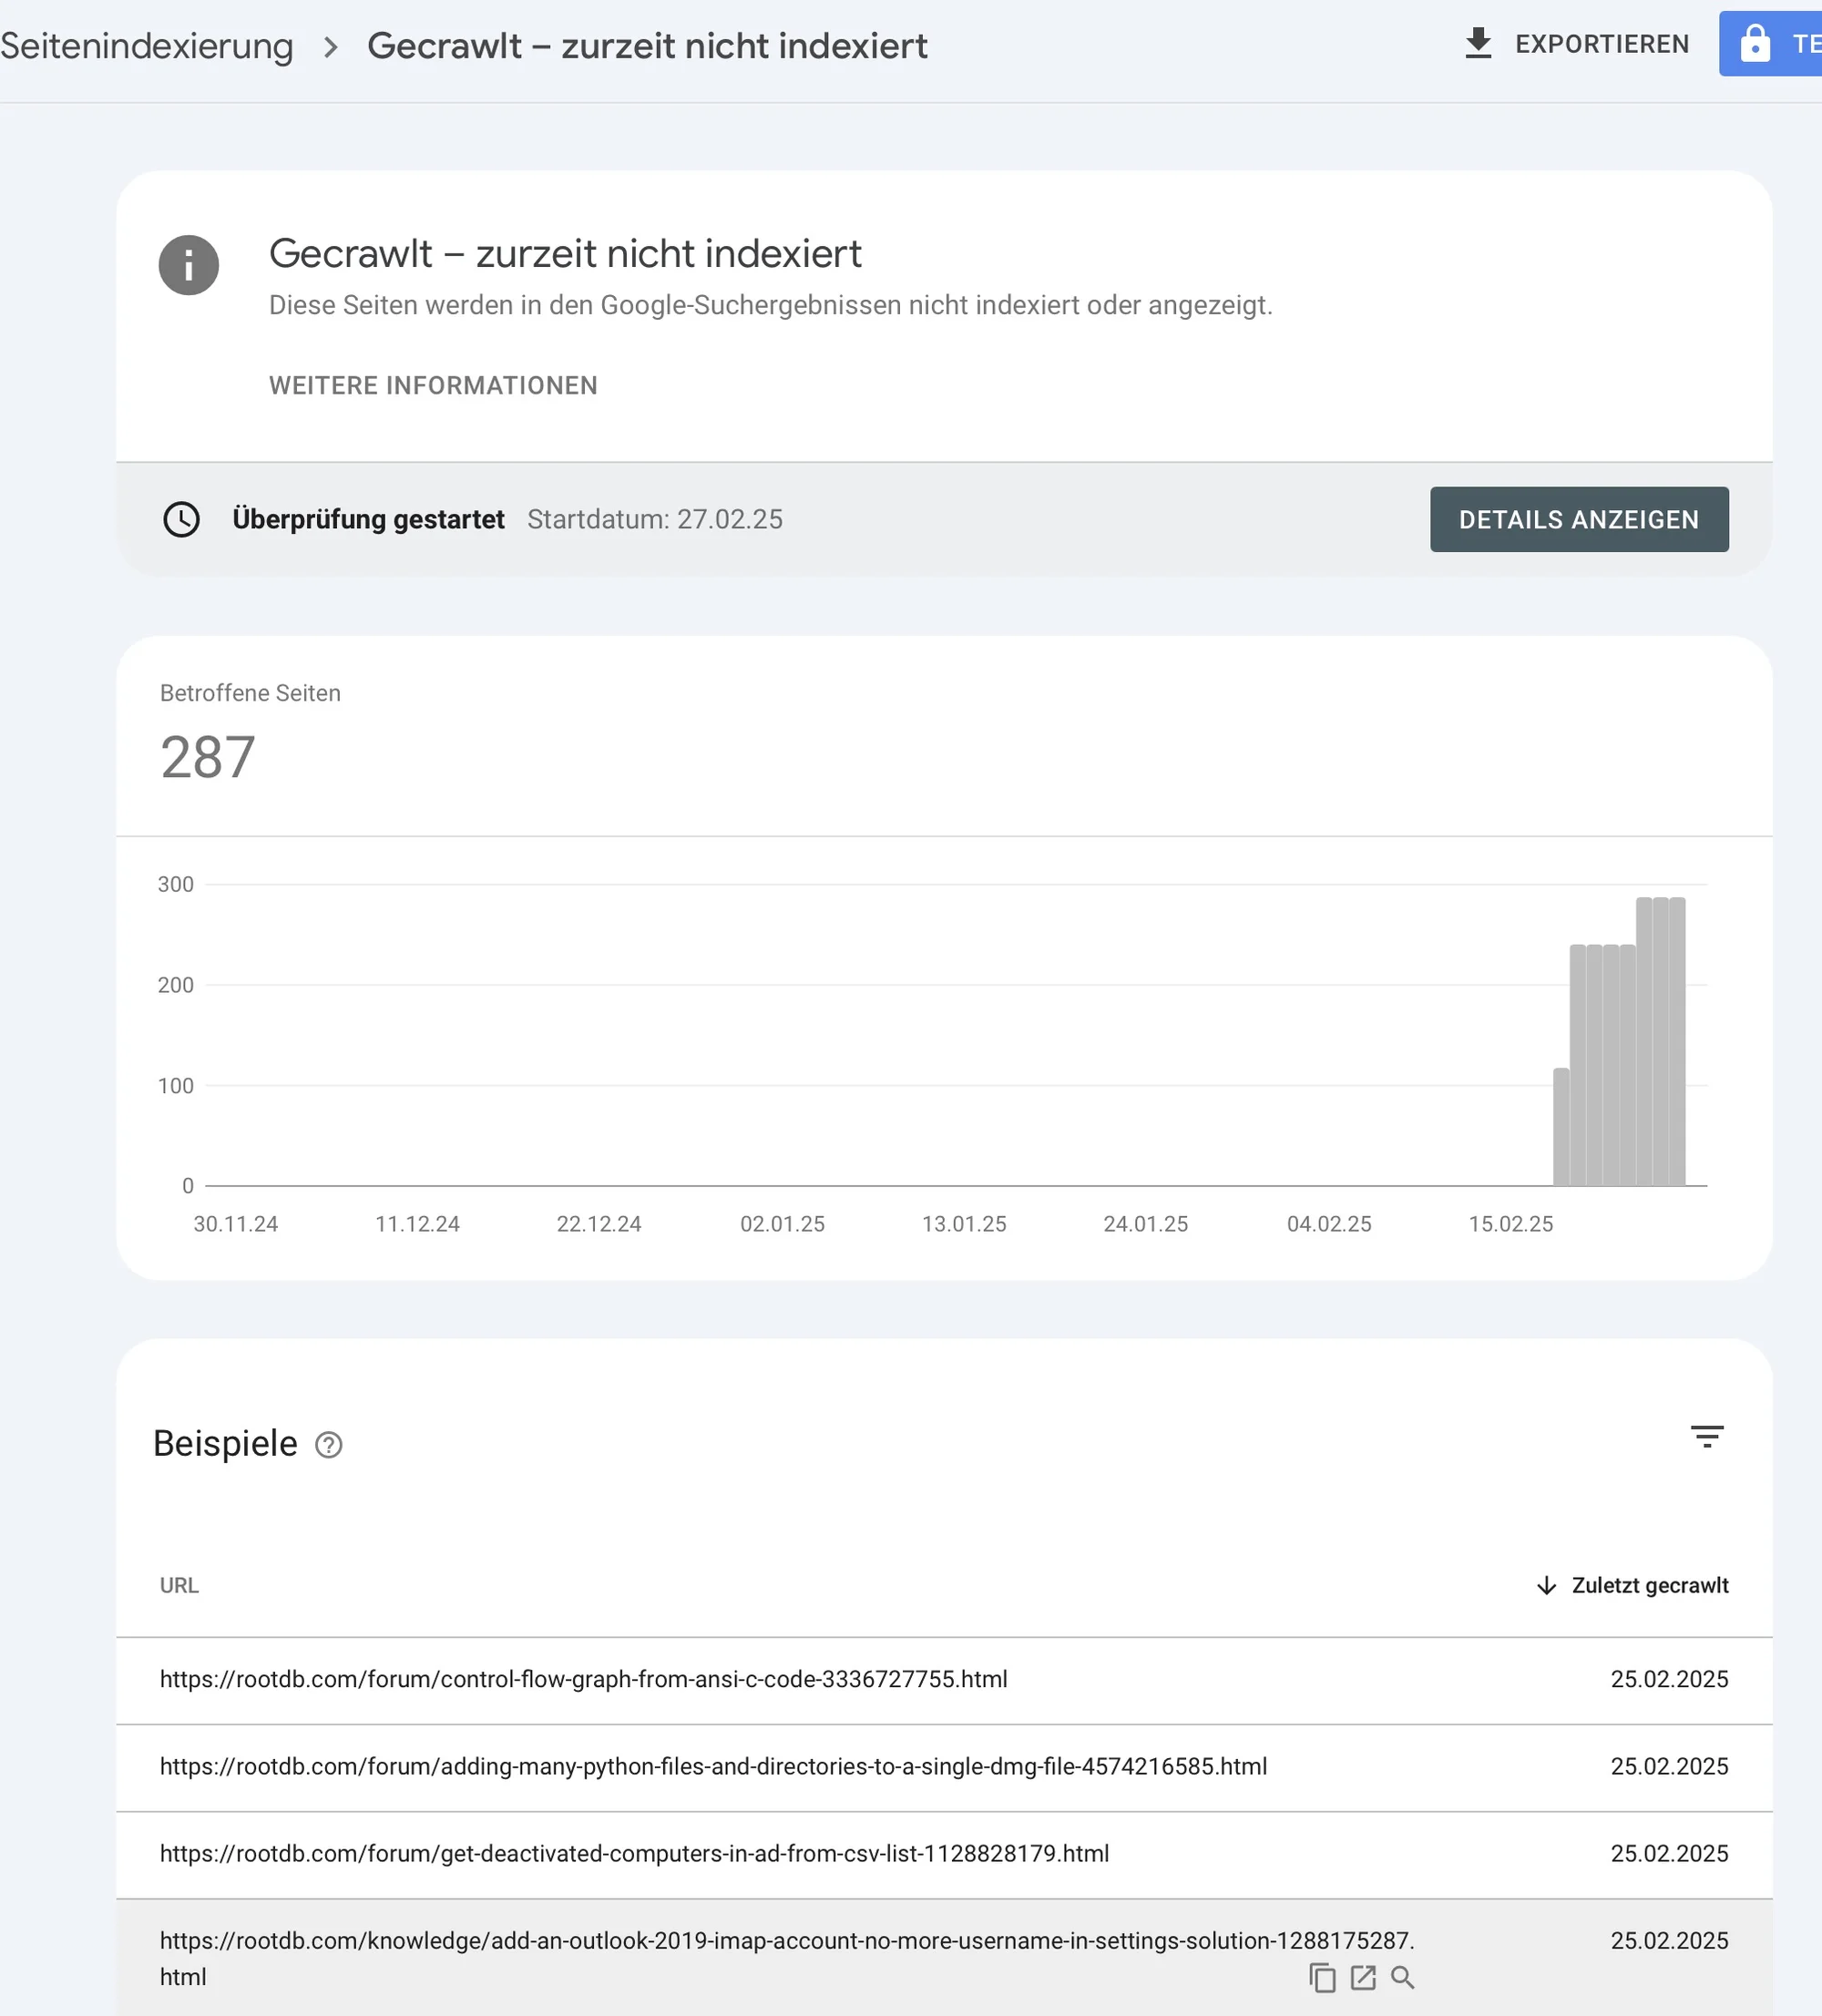
But Google has not indexed this page for some reason. They call it "crawled - not currently indexed". Unfortunately, the explanation is meaningless and useless:

bildschirmfoto 2025-02-28 um 16.32.05

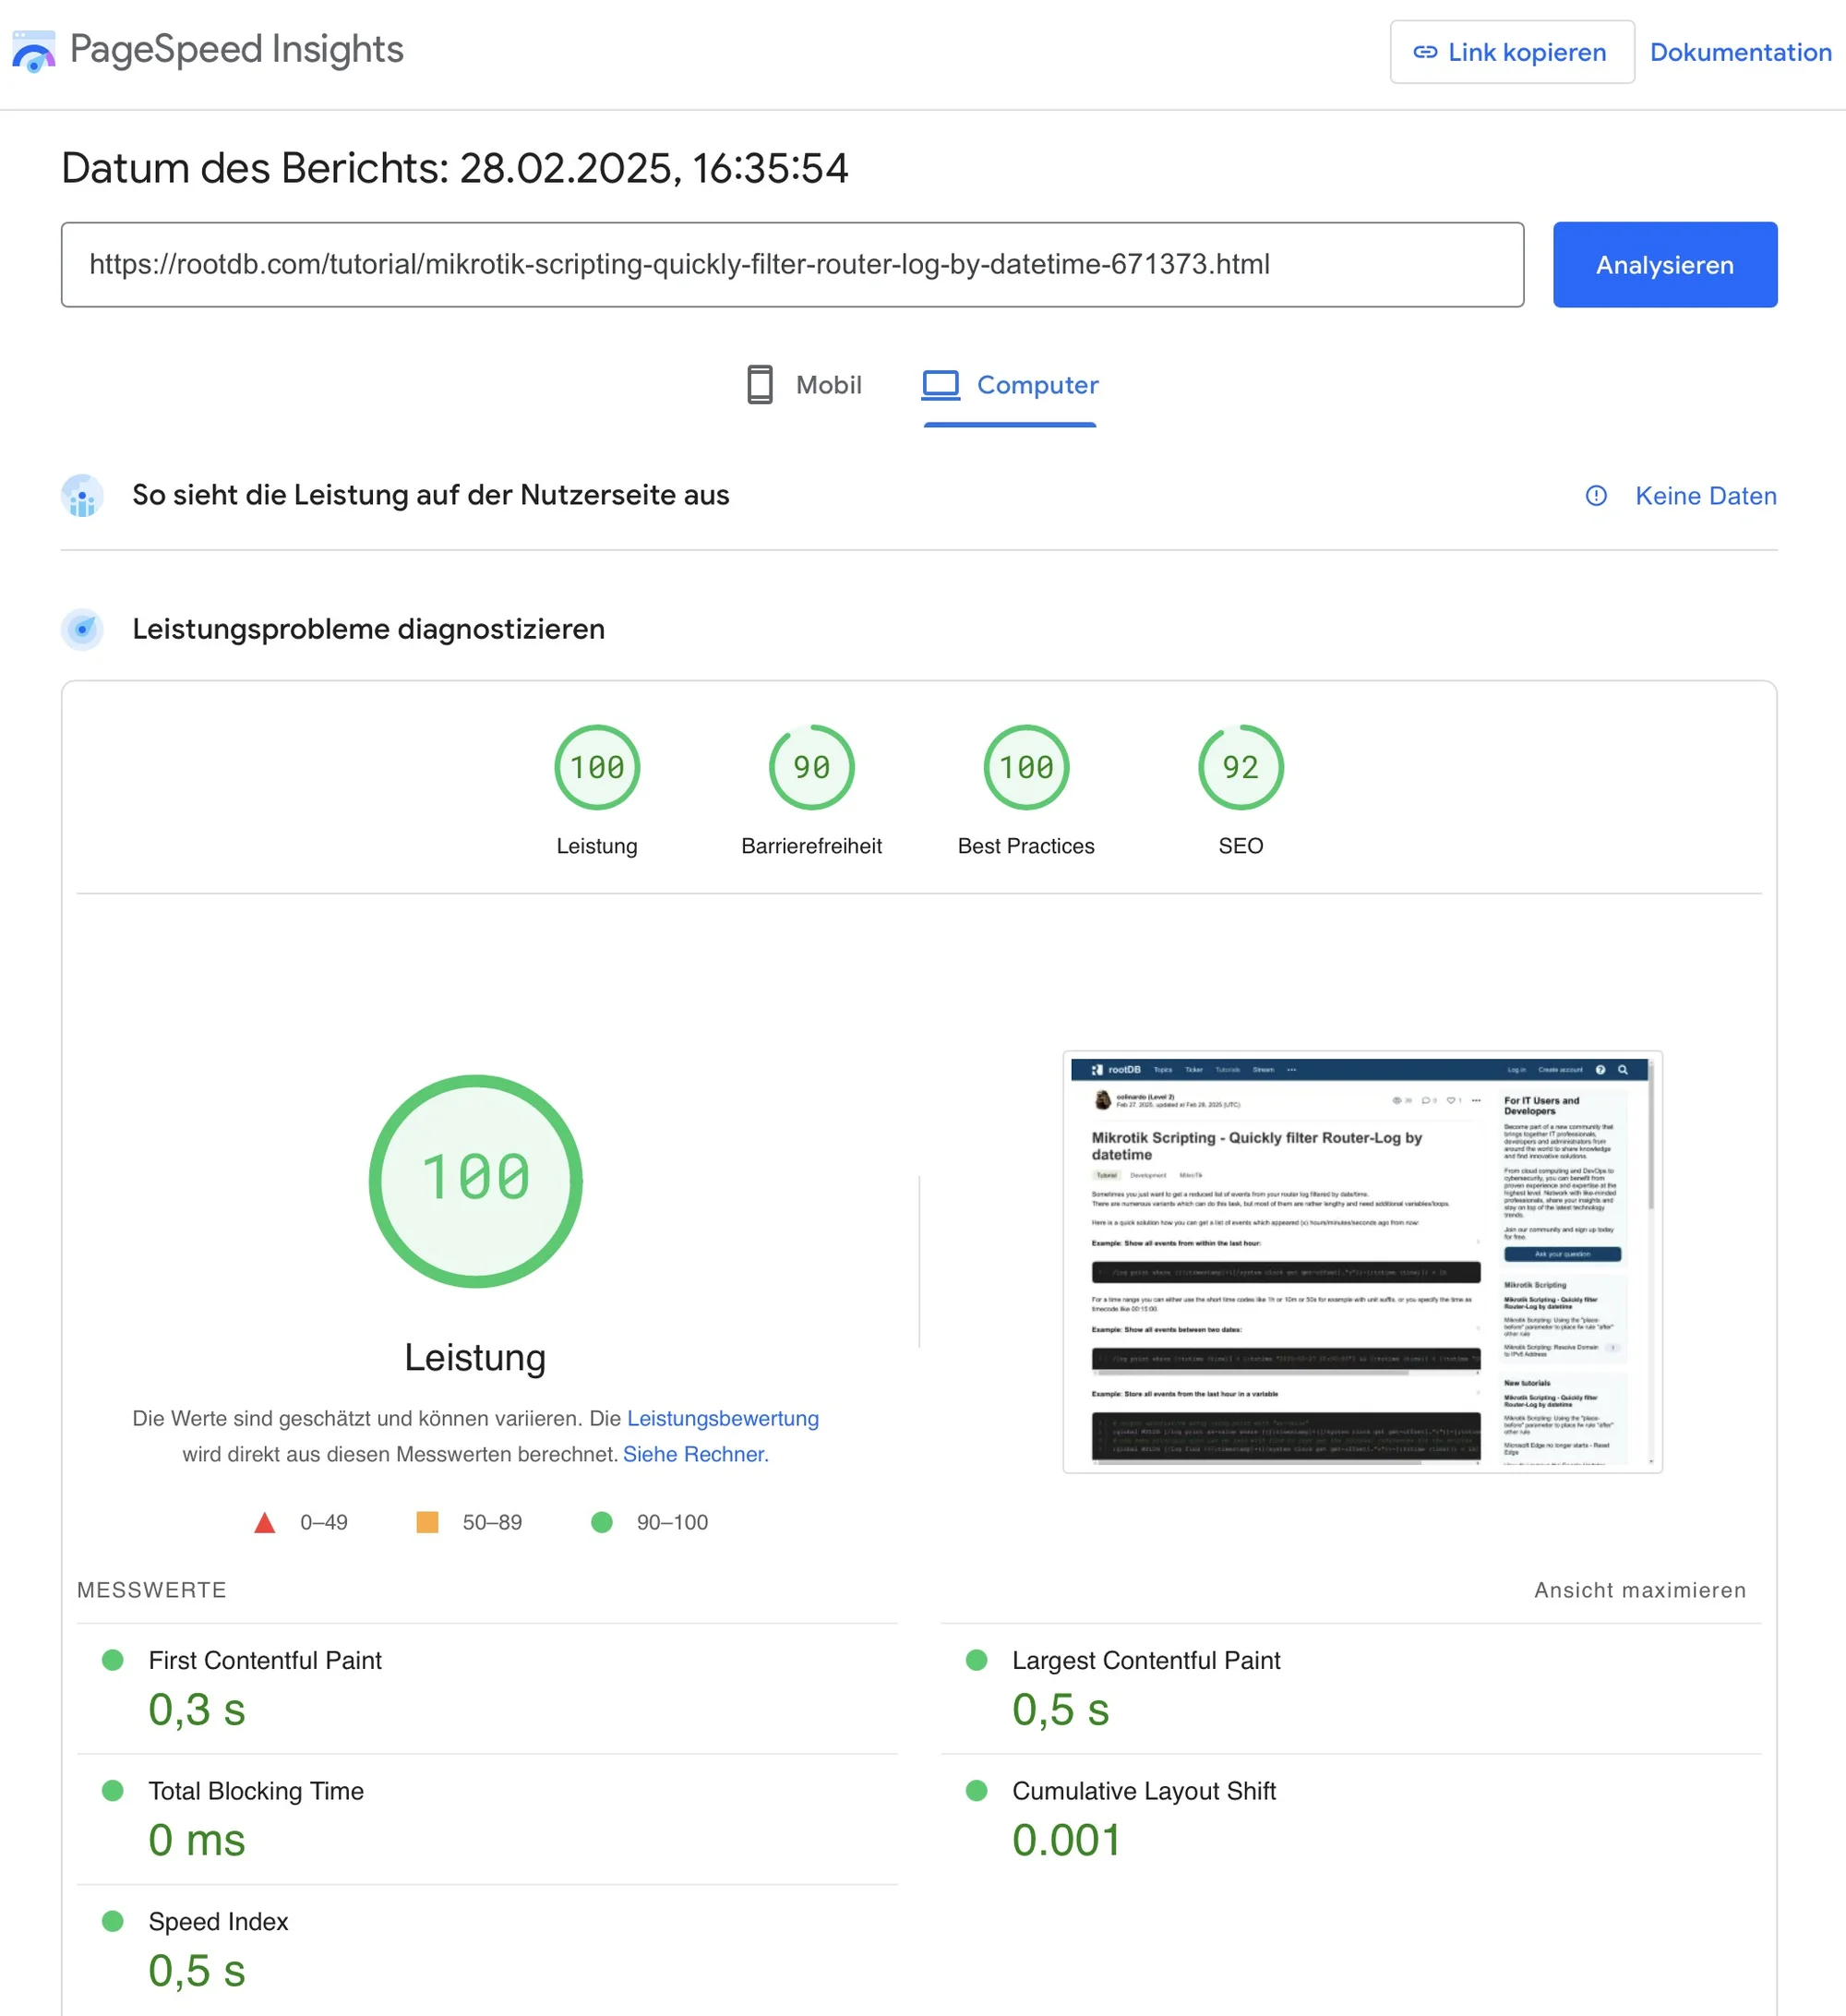
Well, there may be errors on the page. You can check that, of course. So let's go to PageSpeed Insights and test a post:

bildschirmfoto 2025-02-28 um 16.37.00

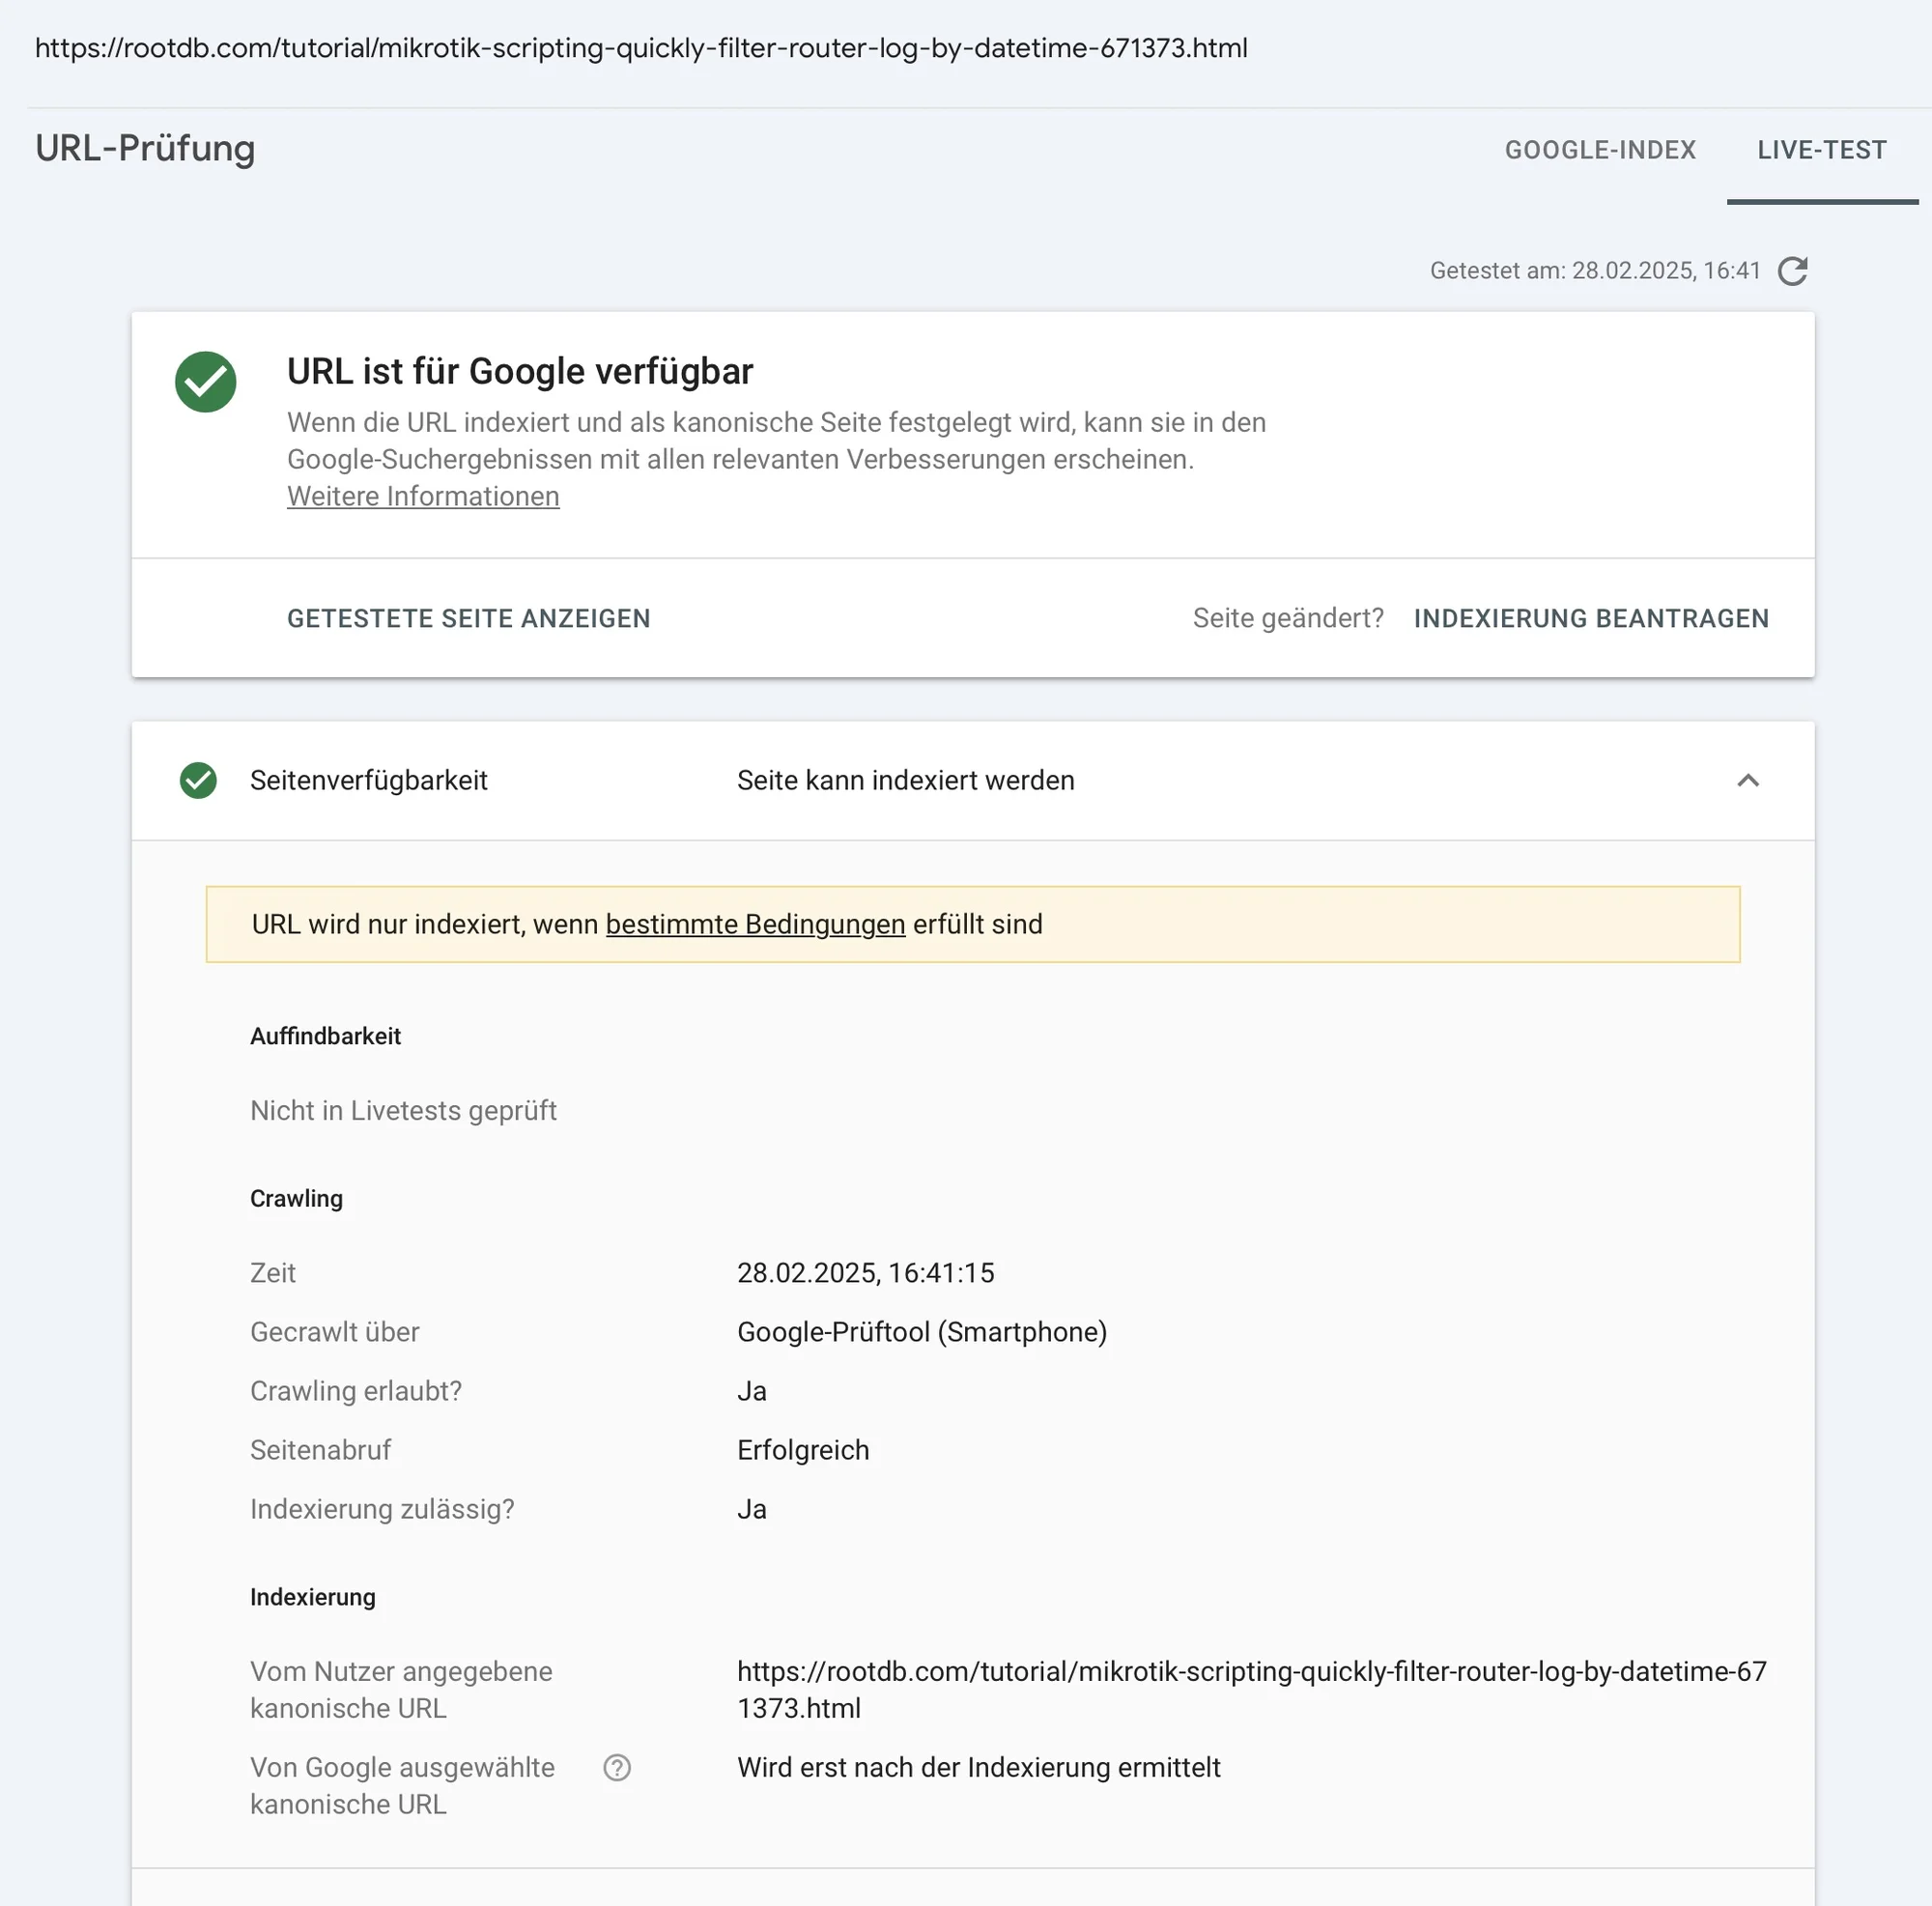
Hmm, 100%. OK, let's test the page again in Google Search Console:

bildschirmfoto 2025-02-28 um 16.42.01

Everything is fine again. I think Google is treating sites that aren't from the US unfairly. I don't know how else to explain it.

So here is my honest opinion after 20 years of SEO: I don't know why our site with the .com domain is not indexed by Google. I've tried everything I know about SEO.

Maybe we just have to wait a little longer. But if you find a bug or have an idea, just let me know. But as I said, we have 2 other portals with exactly the same programming and the same SEO. Everything works there.

Regards,
Frank
Frank-avatar
Frank 43 days ago
Question
The State of PHP 2024
A good article about PHP and the current state of the language.

PHP remains a cornerstone of web development, powering millions of websites worldwide. Its vibrant and dedicated community values its flexibility and ease of use. But what is the current state of PHP development?

https://blog.jetbrains.com/phpstorm/2025/02/state-of-php-2024/

This site, for example, was developed entirely in PHP. What do you think about the future of PHP?

regards,
Frank
colinardo-avatar
colinardo 44 days ago
General4 comments
Not finding any of our posts in Google or other search engines
Hi @Frank.
just checked if some of our articles are already found in Google, but no luck. None of the articles can be found via Google. In total there are only 5, mainly navigation results indexed by Google.

https://www.google.com/search?q=site%3Arootdb.com

We are now two weeks online, is this normal? Or is there perhaps still an indexing bug with the site?!

Best regards @colinardo
Frank-avatar
Frank 44 days ago
1 comment
Comment: New AI: Claude 3.7 Sonnet with deep thinking introduced
There is also a free Claude app for MacOS or iOS that works very well. In addition, Claude is integrated into good editors for developers.

For example, I use the one from Jetbrains or the open source ZED editor. Both have perfect integration of the Claude AI. So you don't have to copy and paste code all the time. You just select the relevant code and tell the AI what you want it to do.

P.S. I haven't seen a faster editor for developers than ZED. You should check it out face-smile

Regards,
Frank
colinardo-avatar
colinardo 45 days ago
Tutorial
Mikrotik Scripting - Quickly filter Router-Log by datetime
Sometimes you just want to get a reduced list of events from your router log filtered by date/time.
There are numerous variants which can do this task, but most of them are rather lengthy and need additional variables/loops.

Here is a quick solution to filter the list of events by time.

back-to-topExample: Show all events from within the last hour:

/log print where (([:timestamp]+([/system clock get gmt-offset]."s"))-[:totime (time)]) < 1h  

For a time range you can either use the short time codes like 1h or 10m or 50s with unit suffix, or you specify the time in timecode syntax like 00:15:00.

back-to-topExample: Show all events since the current day at midnight

/log print where [:totime (time)] >= [:totime [/system clock get date]]

back-to-topExample: Show all events between two dates:

/log print where [:totime (time)] > [:totime "2025-02-27 00:00:00"] && [:totime (time)] < [:totime "2025-02-28 00:00:00"]   

back-to-topExample: Store all events from the last hour in a variable

# output associative array using print with "as-value" 
:global MYLOG [/log print as-value where (([:timestamp]+([/system clock get gmt-offset]."s"))-[:totime (time)]) < 1h]  
# the same principle also can be used with find to just get the internal references for the entries
:global MYLOG [/log find (([:timestamp]+([/system clock get gmt-offset]."s"))-[:totime (time)]) < 1h]  


back-to-topExample: Show all events between two dates and matching the string "logged in" in it's message body:

/log print where [:totime (time)] > [:totime "2025-02-27 00:00:00"] && [:totime (time)] < [:totime "2025-02-28 00:00:00"]  && message ~ "logged in"  


Important note: This method only works reliable starting with Router OS Version 7.17. This is because before this release, the time column in the log section had no standard format and an additional if check was needed. In the current releases the column now uses the ISO standard time format for every entry wich makes processing much easier.

Regards @colinardo
TechGuru-avatar
TechGuru 46 days ago
Information1 comment
New AI: Claude 3.7 Sonnet with deep thinking introduced
Yesterday, AI maker Anthropic unveiled Claude 3.7 Sonnet, which has adaptive reasoning capabilities. Claude is in direct competition with ChatGPT. In developer circles, Claude is preferred because the AI is more accurate.

Claude 3.7 Sonnet is a hybrid AI model that combines rapid response capabilities with advanced reasoning, allowing users to dynamically adjust the model's computational intensity for different tasks ('Normal' and 'Extended').

bildschirmfoto 2025-02-25 um 14.41.35

A unique feature of this model is that users can fine-tune computational intensity using a slider. This allows precise control over resource allocation and associated costs.

Claude 3.7 Sonnet operates as a hybrid model, switching between two modes:

  • Fast response for simple tasks
  • Deep thinking for complex tasks

In its advanced thinking mode, Claude 3.7 Sonnet uses active self-reflection before providing answers. This leads to improvements in areas such as

  • Mathematics
  • Physics
  • Following instructions accurately
  • Programming

What do you think about these developments? Do you see specific applications for your projects?
TechGuru-avatar
TechGuru 46 days ago
TechGuru has registered
Focus: Project Management and Agile Methods - User group: Developer.
Worawasu-avatar
Worawasu 47 days ago
4 commentsSolved
Comment: Cisco AIR-CAP1532I-E-K9 SAP Image (Autonomus) download ?
Hi Martin,
Can I have the image file from you? (ap1g3-k9w7-tar.153-3.JK11.tar) I looked all over the internet and couldn't find a download link. Even with my Cisco account, I do not have access to download this file.
Worawasu-avatar
Worawasu 47 days ago
Worawasu has registered
Focus: IT Infrastructure Planning and Optimization - User group: Network Administrator.
Frank-avatar
Frank 47 days ago
Information
What is the difference between iPhone 16e and iPhone 16?
The iPhone 16e and iPhone 16 differ in a few ways, even though they are part of the same family.

Here are the main differences:

  • With a starting price of €699 for 128GB, the iPhone 16e is significantly cheaper than the iPhone 16, which starts at €949.
  • The iPhone 16e retains the notch, while the iPhone 16 uses the Dynamic Island.
  • The iPhone 16 offers a higher peak brightness of 2,000 nits compared to 1,200 nits for the iPhone 16e.
  • The iPhone 16e is only available in two colours (black and white), while the iPhone 16 comes in five colours (plus pink, teal, ultramarine).
  • The iPhone 16 has a dual camera system with an additional 12MP ultra wide angle camera, which the 16e lacks.
  • The iPhone 16e lacks some camera features such as macro, action and cinematic modes.
  • Both models use the A18 chip, but the iPhone 16 has a 6-core graphics processor, while the 16e has a 4-core graphics processor.
  • The iPhone 16 also supports MagSafe, while the iPhone 16e does not.
  • The G5 modem with the new C1 chip is Apple's own design (7 years in development). The iPhone 16 uses a Qualcomm Snapdragon X75 5G modem.
  • The iPhone 16 has a slightly longer battery life of 27 hours compared to 26 hours for the iPhone 16e.

Despite the differences, both models have a lot in common, such as the A18 chip, 5G support, 6.1-inch OLED display, 48-megapixel primary camera, Action Button, USB-C port and Apple Intelligence support.

face-smile
colinardo-avatar
colinardo 51 days ago
Tutorial
Mikrotik Scripting: Using the "place-before" parameter to place fw rule "after" other rule
This is a quick trick to programmatically place firewall rules after specific rules, not before.

Normally you already have the place-before parameter when adding firewall rules, but there can be times when you programmatically need to place the rule after another specific rule.

Assumed you want to insert a new rule after the common "established, related" states firewall rule in the input chain, you could do this

/ip firewall filter add chain=input protocol=tcp dst-port=22 action=accept place-before=([get ([find chain=input && connection-state ~ "established"]->0)]->".nextid")  

This places the rule after it. It makes use of the .nextid property of the entry to get the internal id of the next item in the list. This also works when the rule is the last one in the chain, because the .nextid property will then automatically receive the maximum internal id reference *ffffffff.

The above oneliner assumes that a specific rule already exists, otherwise this command will fail. So to be secure you normally want to do a check if the rule exists:

{
    :local rule ([/ip firewall filter find chain=input && connection-state ~ "established"]->0)  
    :if ($rule) do={
       /ip firewall filter add chain=input protocol=tcp dst-port=22 action=accept place-before=([get $rule]->".nextid")  
    } else={
       :error "Rule not found!"  
    }
}

Regards @colinardo
max-avatar
max 52 days ago
Tutorial
Microsoft Edge no longer starts - Reset Edge
On a couple of occasions, after logging in to Edge, the browser itself would no longer start. The usual PC restart didn't help either. Tested on Windows 11. Here are two things that helped me:

back-to-topRepair Edge


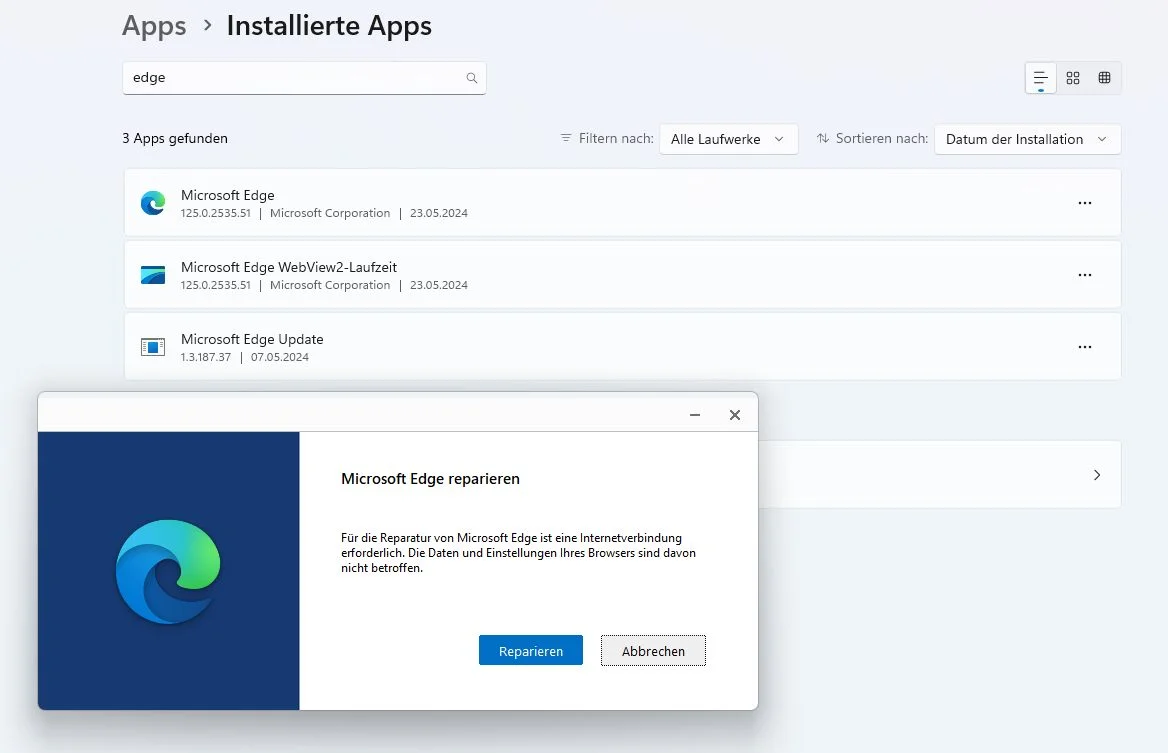
Go to Settings -> Apps -> Installed Apps and search for 'edge'.

Select 'Change' from the three dot menu and then click 'Repair'.

3388144983656078

If this does not help, you may need to delete files.

back-to-topDelete the Edge user profile


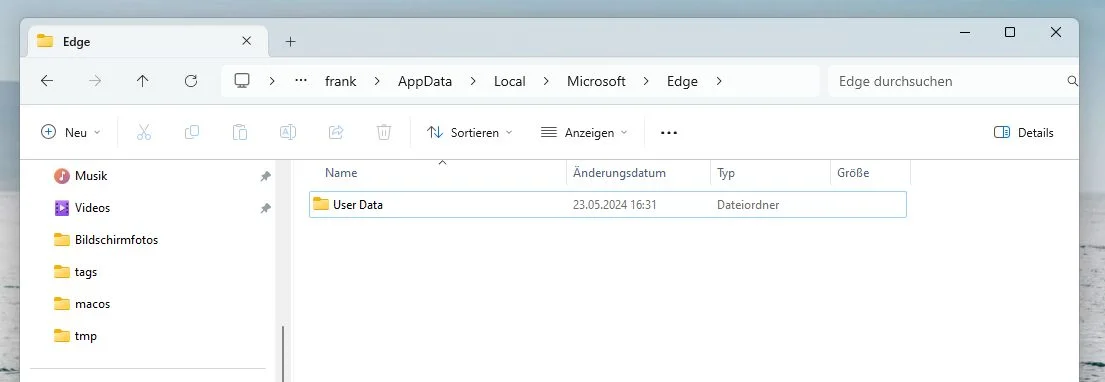
In Explorer, browse to the following directory

C:\Users\username\AppData\Local\Microsoft\Edge

In general, you can only permanently delete the User Data folder if your Edge browser no longer starts or is broken.  Otherwise, there are open directories in the folder that cannot be deleted.

Here you will find the 'User Data' folder. Just delete it completely. Edge should then start up as if you had reinstalled it.

3388144957481983

back-to-topWhat happens to existing favourites and passwords?


As I usually synchronise through my Microsoft account, the favourites and passwords were back immediately.
Without synchronisation, they are probably gone.

back-to-topSo always make a backup!


Regards,
@max
Frank-avatar
Frank 53 days ago
Tutorial
How do I remove the Google Updater from macOS?
Who hasn't experienced this: you delete Google Chrome in macOS and yet the annoying ‘Google Updater has added objects that can run in the background’ messages continue to appear. Even if you have disabled them in the settings ‘General -> Login objects -> Allow in background’, they are still active in the system.

The tip refers to macOS 17, but should also work with other versions. In general, you should be careful not to delete the wrong files. A backup is very helpful here.

I have been deleting MacOS programs for years using the free programme AppCleaner.

back-to-topIn this way, background services can be permanently removed:


Open a terminal and type the following command

cd ~/Library/LaunchAgents

There are two files here that belong to Google. If there are other files in the folder, they belong to other background services. Please do not delete them.

com.google.keystone.agent.plist
com.google.keystone.xpcservice.plist

The two Google files will now be deleted:

rm com.google.keystone.*

If the service is still running and cannot be deleted, you will need to type 'sudo' in front of it and enter the login password.

There are two other directories that should be searched in the same way:

cd /Library/LaunchAgents
cd /Library/LaunchDaemons

If there is still a 'google' file, delete it too.

Then close and re-open System Preferences. The 'Google Update' service should no longer appear in the list or notifications. If you want to be absolutely sure, you can simply restart your system.

This procedure usually works for all background services under MacOS.

Finally, we check that the following directory exists

cd ~/Library/Google
ls -la

If this is the case, please run the following uninstall script:

.~/Library/Google/GoogleSoftwareUpdate/GoogleSoftwareUpdate.bundle/Contents/Resources/ksinstall --uninstall
rm -r ~/Library/Google/

The directory is now gone, and with it the 'Google Update' background service.

Kind regards,
Frank
Frank-avatar
Frank 55 days ago
Tutorial
Fast string compare function for PHP
Hello User,

As a developer, I was faced with a challenge: I needed a fast but rough string comparison function for our website. It checks the approximate percentage change between old and new text.

I tried a few PHP functions like similar_text() and later levenshtein(). But even these native functions took over 30 seconds for long texts - far too long for our website.

My search for a more efficient solution led me to a simple but highly effective method. Instead of complex algorithms, I now use basic word processing techniques such as length comparison and word counting. The result? An 80% to 90% increase in performance over similar_text() and levenshtein().

My humble stringCompare() function compares two texts ($str1, $str2) and returns the difference as a percentage. It is not only fast, but also easy to understand and implement. However, it is not 100% accurate (depending on the length of the text, single digit differences are possible). It focuses more on quantitative aspects (length, word frequency) than on qualitative aspects (meaning, context). It is effective at identifying structural similarities and literal matches, but may miss more subtle differences or similarities in content.

I would like to share this solution with the developer community in the hope that it may help with similar performance issues.

public static function stringCompare($str1, $str2): float {
        if ($str1 === $str2) return 0.0;

        $str1 = self::cleanString($str1);
        $str2 = self::cleanString($str2);

        if ($str1 === '' && $str2 === '') return 0.0;    
        if ($str1 === '' || $str2 === '') return 100.0;    

        $len1 = strlen($str1);
        $len2 = strlen($str2);

        // length change
        $lenChange = abs($len1 - $len2) / max($len1, $len2);

        // Improved detection of repeated text
        $repetitionFactor = 0;
        if (str_contains($str2, $str1) || str_contains($str1, $str2)) {
            $repetitions = max($len1, $len2) / min($len1, $len2);
            $repetitionFactor = 1 - (1 / $repetitions);
        }

        // character comparison
        $chars1 = count_chars($str1, 1);
        $chars2 = count_chars($str2, 1);
        $charDiff = 0;
        foreach (array_keys($chars1 + $chars2) as $i) {
            $charDiff += abs(($chars1[$i] ?? 0) / $len1 - ($chars2[$i] ?? 0) / $len2);
        }
        $charChange = $charDiff / 2;  // normalisation

        // comparison of words
        $words1 = str_word_count(mb_strtolower($str1), 1);
        $words2 = str_word_count(mb_strtolower($str2), 1);
        $wordCount1 = array_count_values($words1);
        $wordCount2 = array_count_values($words2);
        $wordDiff = 0;
        $allWords = array_unique(array_merge(array_keys($wordCount1), array_keys($wordCount2)));
        
        $count1 = count($words1);
        $count2 = count($words2);

        if ($count1 > 0 || $count2 > 0) {
            foreach ($allWords as $word) {
                $freq1 = $count1 > 0 ? ($wordCount1[$word] ?? 0) / $count1 : 0;
                $freq2 = $count2 > 0 ? ($wordCount2[$word] ?? 0) / $count2 : 0;
                $wordDiff += abs($freq1 - $freq2);
            }
            $wordChange = $wordDiff / 2;  // normalisation
        } else {
            // If no words are recognised, we only use the character comparison.
            $wordChange = $charChange;
        }

        // Weighted total change
        $overallChange = max(
            $lenChange,
            $repetitionFactor,
            ($charChange * 0.4 + $wordChange * 0.6)
        );

        return round(min($overallChange, 1.0) * 100, 2);
}

Example:

$str1 = "This is an example text for the comparison";    
$str2 = "xxxx xx xx xxxxxxx xxxx xxx xxx xxxxxxxxxx";    
echo "Percentage change (same position, replaced by x): " . TextComparison::stringCompare($str1, $str2) . "%\n";    

Result: Percentage change (same position, replaced by x) : 93.59%

face-smile
Lochkartenstanzer-avatar
Lochkartenstanzer 57 days ago
1 comment
Comment: Developer diary: rootdb is our new international IT forum
/offtopic: Using same account as in administrator.de works.
admtech-avatar
admtech 57 days ago
General1 comment
Developer diary: rootdb is our new international IT forum
Hello users,

The previously announced new international forum is now live:

back-to-toprootDB.com


The idea of a bilingual site on administrator.de with only one domain failed for us. Neither Google nor other search engines supported it. No matter what we tried, the English articles were usually not found by the search engines. We were always only seen as a German site.

Now we are launching this new international forum with a .com domain that fits the topic well: https://rootdb.com/ is our new home for establishing an international IT forum. Everything on rootDB will be in English only. The domain rootdb.com is easy to remember and consists of only a few characters. It can be entered quickly. In addition, similar to the term ‘administrator’, it represents the topic of the website.

All English content has been deleted from administrator.de and imported into rootDB. Existing users who have posted or commented in English or registered on the English site have been transferred and can log in as usual. A separate message will be sent to these users. We have done this to ensure that existing content is not lost. The forums are now completely separate. This applies to everything: database, notifications, newsletters, etc.

New users will need to register again.

I hope you like our decision and the new site and look forward to your feedback or a click on the heart.

Best regards,
Frank
emiratesdraw-avatar
emiratesdraw 61 days ago
emiratesdraw has registered
Focus: Development - User group: Sales.
mohammad.sabbah-avatar
mohammad.sabbah 61 days ago
mohammad.sabbah has registered
Focus: Networks - User group: Administrator.
lovequoteshub-avatar
lovequoteshub 65 days ago
lovequoteshub has registered
Focus: Apple/Mac/iOS - User group: Designer.
Jonson-avatar
Jonson 65 days ago
Jonson has registered
Focus: DevOps (Development and Operations) - User group: Consultant.
Ahmed317-avatar
Ahmed317 65 days ago
Ahmed317 has registered
Focus: Android/ChromeOS - User group: Database Administrator.
MorganWorthington-avatar
MorganWorthington 66 days ago
MorganWorthington has registered
Focus: Android/ChromeOS - User group: Application Specialist.
cytionlb123-avatar
cytionlb123 66 days ago
cytionlb123 has registered
Focus: Design/Media - User group: Application Specialist.
fergoshop-avatar
fergoshop 67 days ago
fergoshop has registered
Focus: Other systems - User group: Consultant.
rharteveld-avatar
rharteveld 68 days ago
rharteveld has registered
Focus: Business and System Integration - User group: Administrator.
fleekit75-avatar
fleekit75 69 days ago
fleekit75 has registered
Focus: Business and System Integration - User group: BI Analyst.
mehmetince-avatar
mehmetince 70 days ago
mehmetince has registered
Focus: IT Infrastructure Planning and Optimization - User group: Administrator.
txguy77-avatar
txguy77 70 days ago
txguy77 has registered
Focus: Security - User group: Consultant.
miniwin-avatar
miniwin 72 days ago
miniwin has registered
Focus: Windows in general - User group: Administrator.
martinelias-avatar
martinelias 74 days ago
martinelias has registered
Focus: Editing/Publication - User group: Marketing.
ellite-avatar
ellite 75 days ago
ellite has registered
Focus: Digital Transformation and Innovation - User group: Consultant.
101blockchains-avatar
101blockchains 79 days ago
101blockchains has registered
Focus: Blockchain/Cryptography - User group: Administrator.
rtu560-avatar
rtu560 80 days ago
rtu560 has registered
Focus: Windows server - User group: End-user.
heinz333-avatar
heinz333 83 days ago
heinz333 has registered
Focus: Linux/Unix in general - User group: End-user.
Farmer67-avatar
Farmer67 85 days ago
Farmer67 has registered
Focus: Apple/Mac/iOS - User group: Data Analyst.